Flight Booking App
Optimizing user experience
Project Overview
My first UX project was part of my professional diploma course work at the UXDI. I was delighted to achieve a 95% grade for this one.
I was tasked to build a new mobile flight booking app and go through the complete UX process in order to identify & understand established conventions, industry standards, user pain points & problems. Based off this I had to design a solution based on my findings to reduce user friction and allow for an overall smoother flow through the process of booking a flight.
Goal: To design a mobile flight booking app by analysing already existing and highly adopted flight booking apps to improve the user journey.
Problem
While the process of booking a flight via mobile app is generally considered an easy one, I found that many apps did not match the users mental models exactly, creating significant friction and frustration in what should be a fairly easy, straight-forward process.
Many of the apps analysed were quite cluttered and generally not as very user friendly as they could be. You'd think that in an industry so well established these days that airlines would have this business critical process down to a tee.
Solution
By conducting my own user research with a view to better understand user mental models & expectations and looking at already established conventions, I was able to streamline the booking process, creating an Android app solution that reduces friction and pain points, leading a much simpler and more efficient booking process. The solution focuses specifically on one main user flow - from searching for a flight to a final payment confirmation screen.
Research
User surveys
User interviews
Usability testing
Competitive benchmarking
Analysis
Affinity diagram
Customer journey map
Design
Flow diagram
Wireframing
Prototype in Figma
Annotations for handover
Tools
Miro
Figma
Research
How do similar products approach the problem?
To understand the market landscape and evaluate existing solutions, I examined four products—three well-known airlines and a flight aggregator. This comparison helped me identify established conventions, design models, and best practices. My goal was to create an intuitive and user-friendly design solution.
Through this analysis, I discovered that many apps were unnecessarily complicated and cluttered with ads, leading to my first hypothesis about improving the user experience.
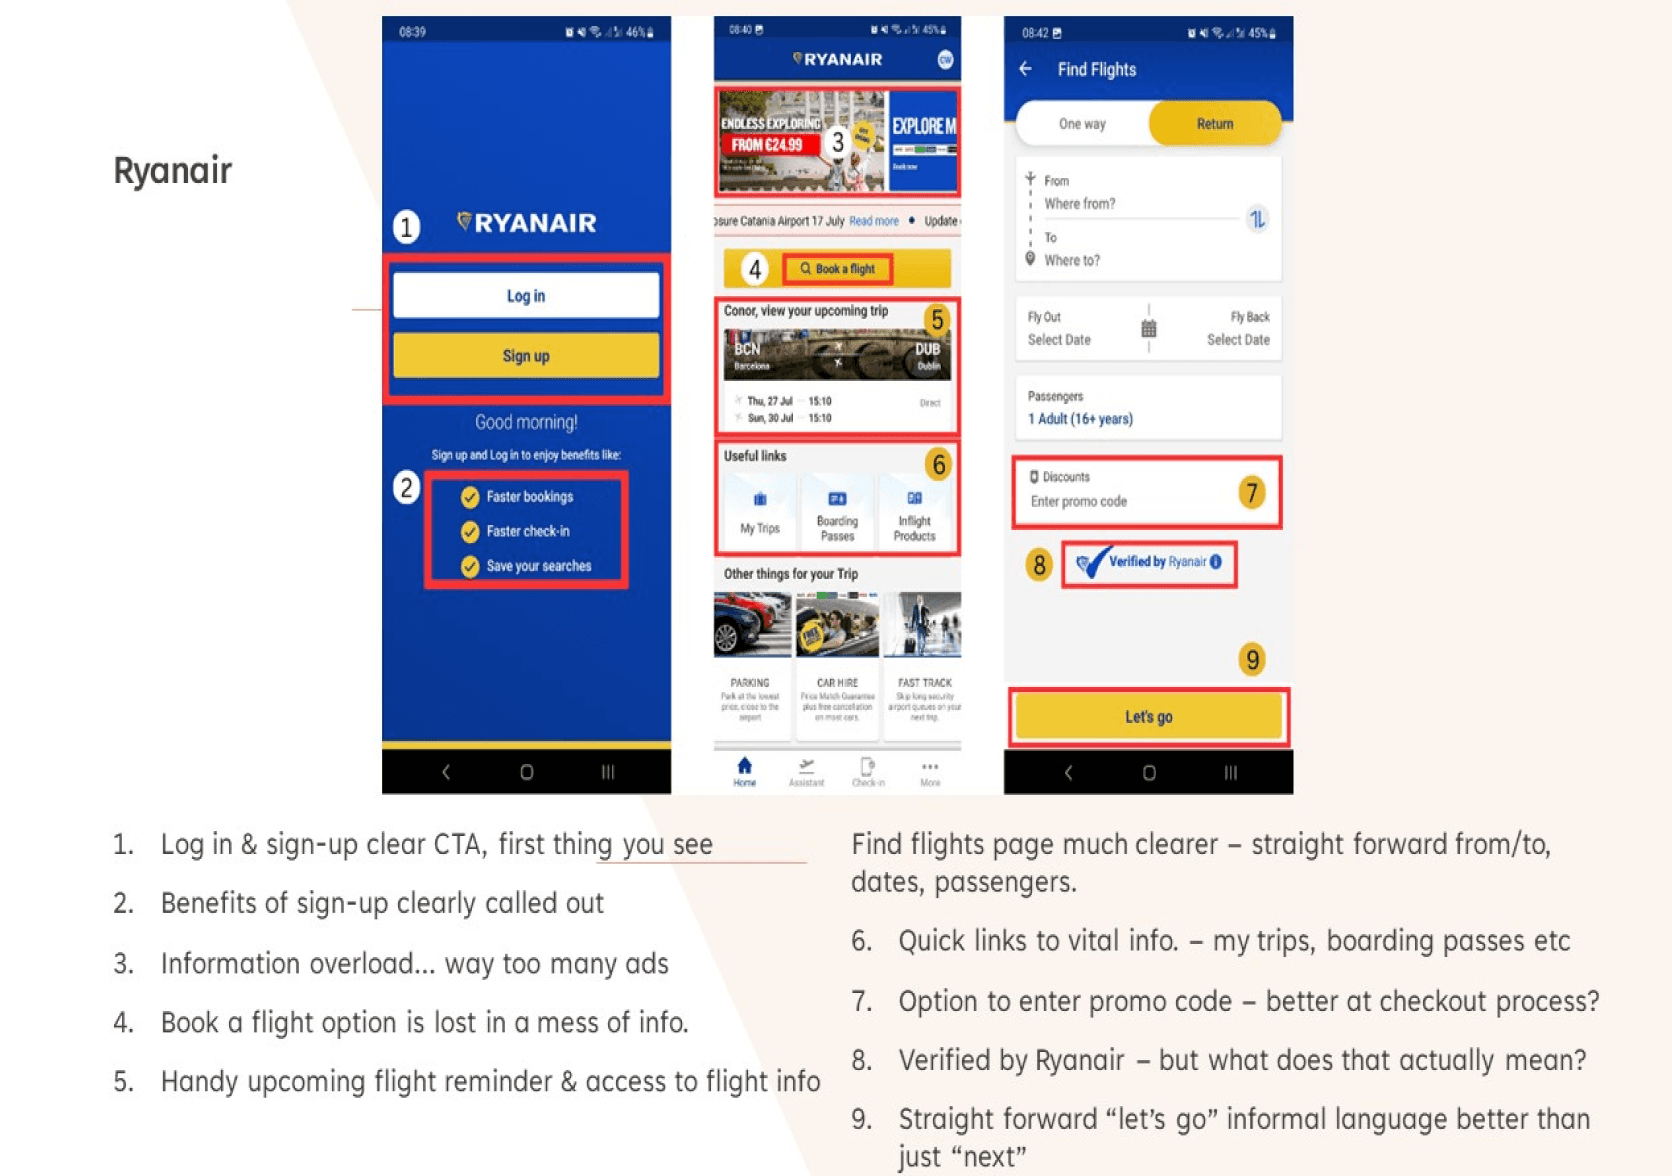
Competitive benchmarking
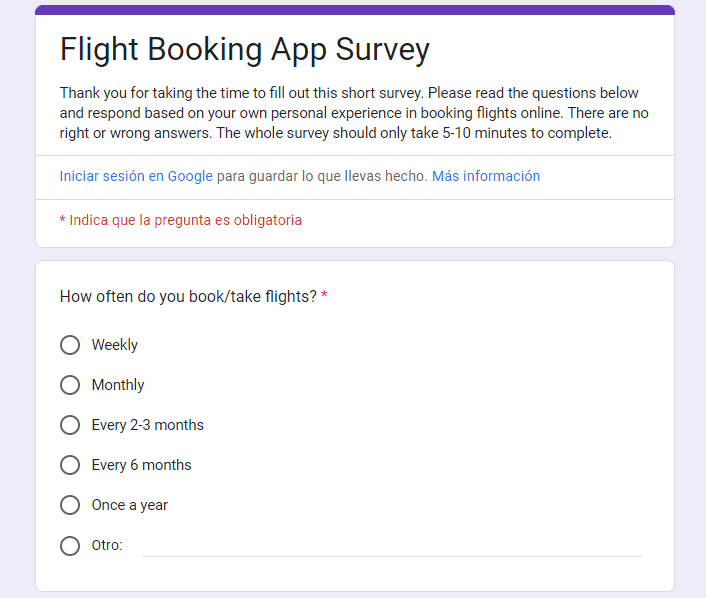
Survey carried out on Google Forms
Survey
I created a survey to collect my own quantitative and qualitative data to better understand user context, behaviour, pain points, and mental models through a multiple-choice survey.
55 people participated in my 10-question survey, leading to the following key conclusions:
99% of users found the booking process easy and as expected.
78% of users did not use add-ons or extras.
Most users wanted fewer ads and add-ons, as they felt these cluttered the screens and impeded a smooth process.
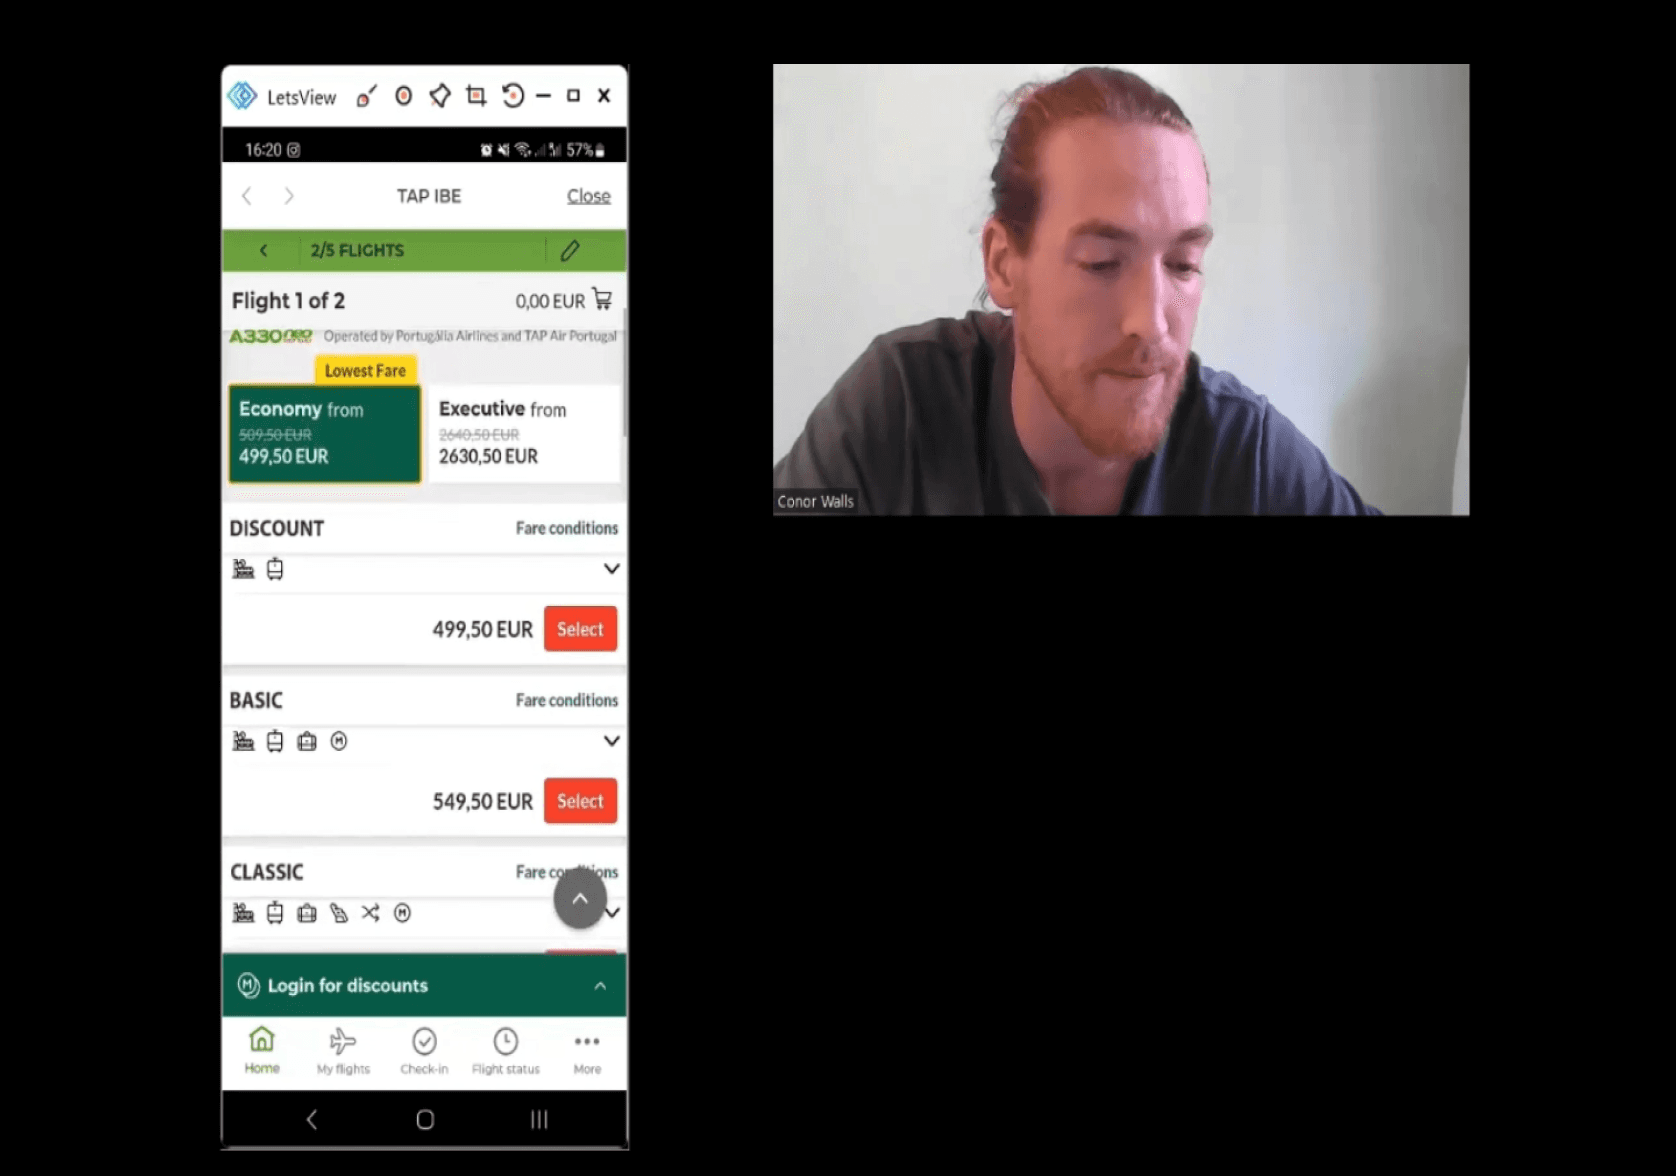
Usability test in progress
Interview & usability testing
The usability test was the most valuable part of the process, allowing me to observe how users actually interacted with the software, rather than just relying on their self-reported behaviour.
I was given two different usability test recordings for analysis, each testing different apps. I also recruited one more participant to conduct an in-person usability test using Zoom to record the session and LetsView to mirror the mobile device's screen. I prepared a full script for the session, which included an interview followed by the usability test.
The task given to users was:
Book a return flight from Barcelona to Dublin on any date in November for 2 people for 5 nights.
Interestingly, the results from the user interviews aligned with my survey findings regarding context, behaviour, pain points, and mental models.

Notes & data from usability tests were grouped for ease of reference
Back button functionality

It was confusing how to go back in the process without closing the whole thing.

The same mistake has happened three times now.
I’m frustrated.
I probably wouldn't continue. It shouldn’t take hours to book.
If it keeps happening, I’d look for other options.
Issues with extras & add-ons
Usually, extras are not worth paying for.
One small bag only?
No idea, it’s not very specific. There’s too much information.
Pay for fast track? The plane is going to take off at the same time anyway.
I look for the best value for money. I’ve no interest in extras.
UI clutter issues
Am I booking a direct flight or not?
It was unclear what it was trying to get me to do.
Quite good, clean, what you need is there.
Overall a straightforward process, just too much clutter.
Usability test quotes
Define
Affinity diagram
I began grouping info based on similarities in context, behaviours, pain points, etc., and color-coded each note to highlight good UX, areas for improvement, and pain points.
As patterns emerged, I broke them down into even more specific elements or focus problem areas, establishing a solid foundation for the design phase. This process allowed me to clearly define the problems to be addressed.
This step required several iterations to refine the final groups and diagram. A key learning was to occasionally step back and take a broader view to ensure I was on the right track, as my original groups were not specific enough.
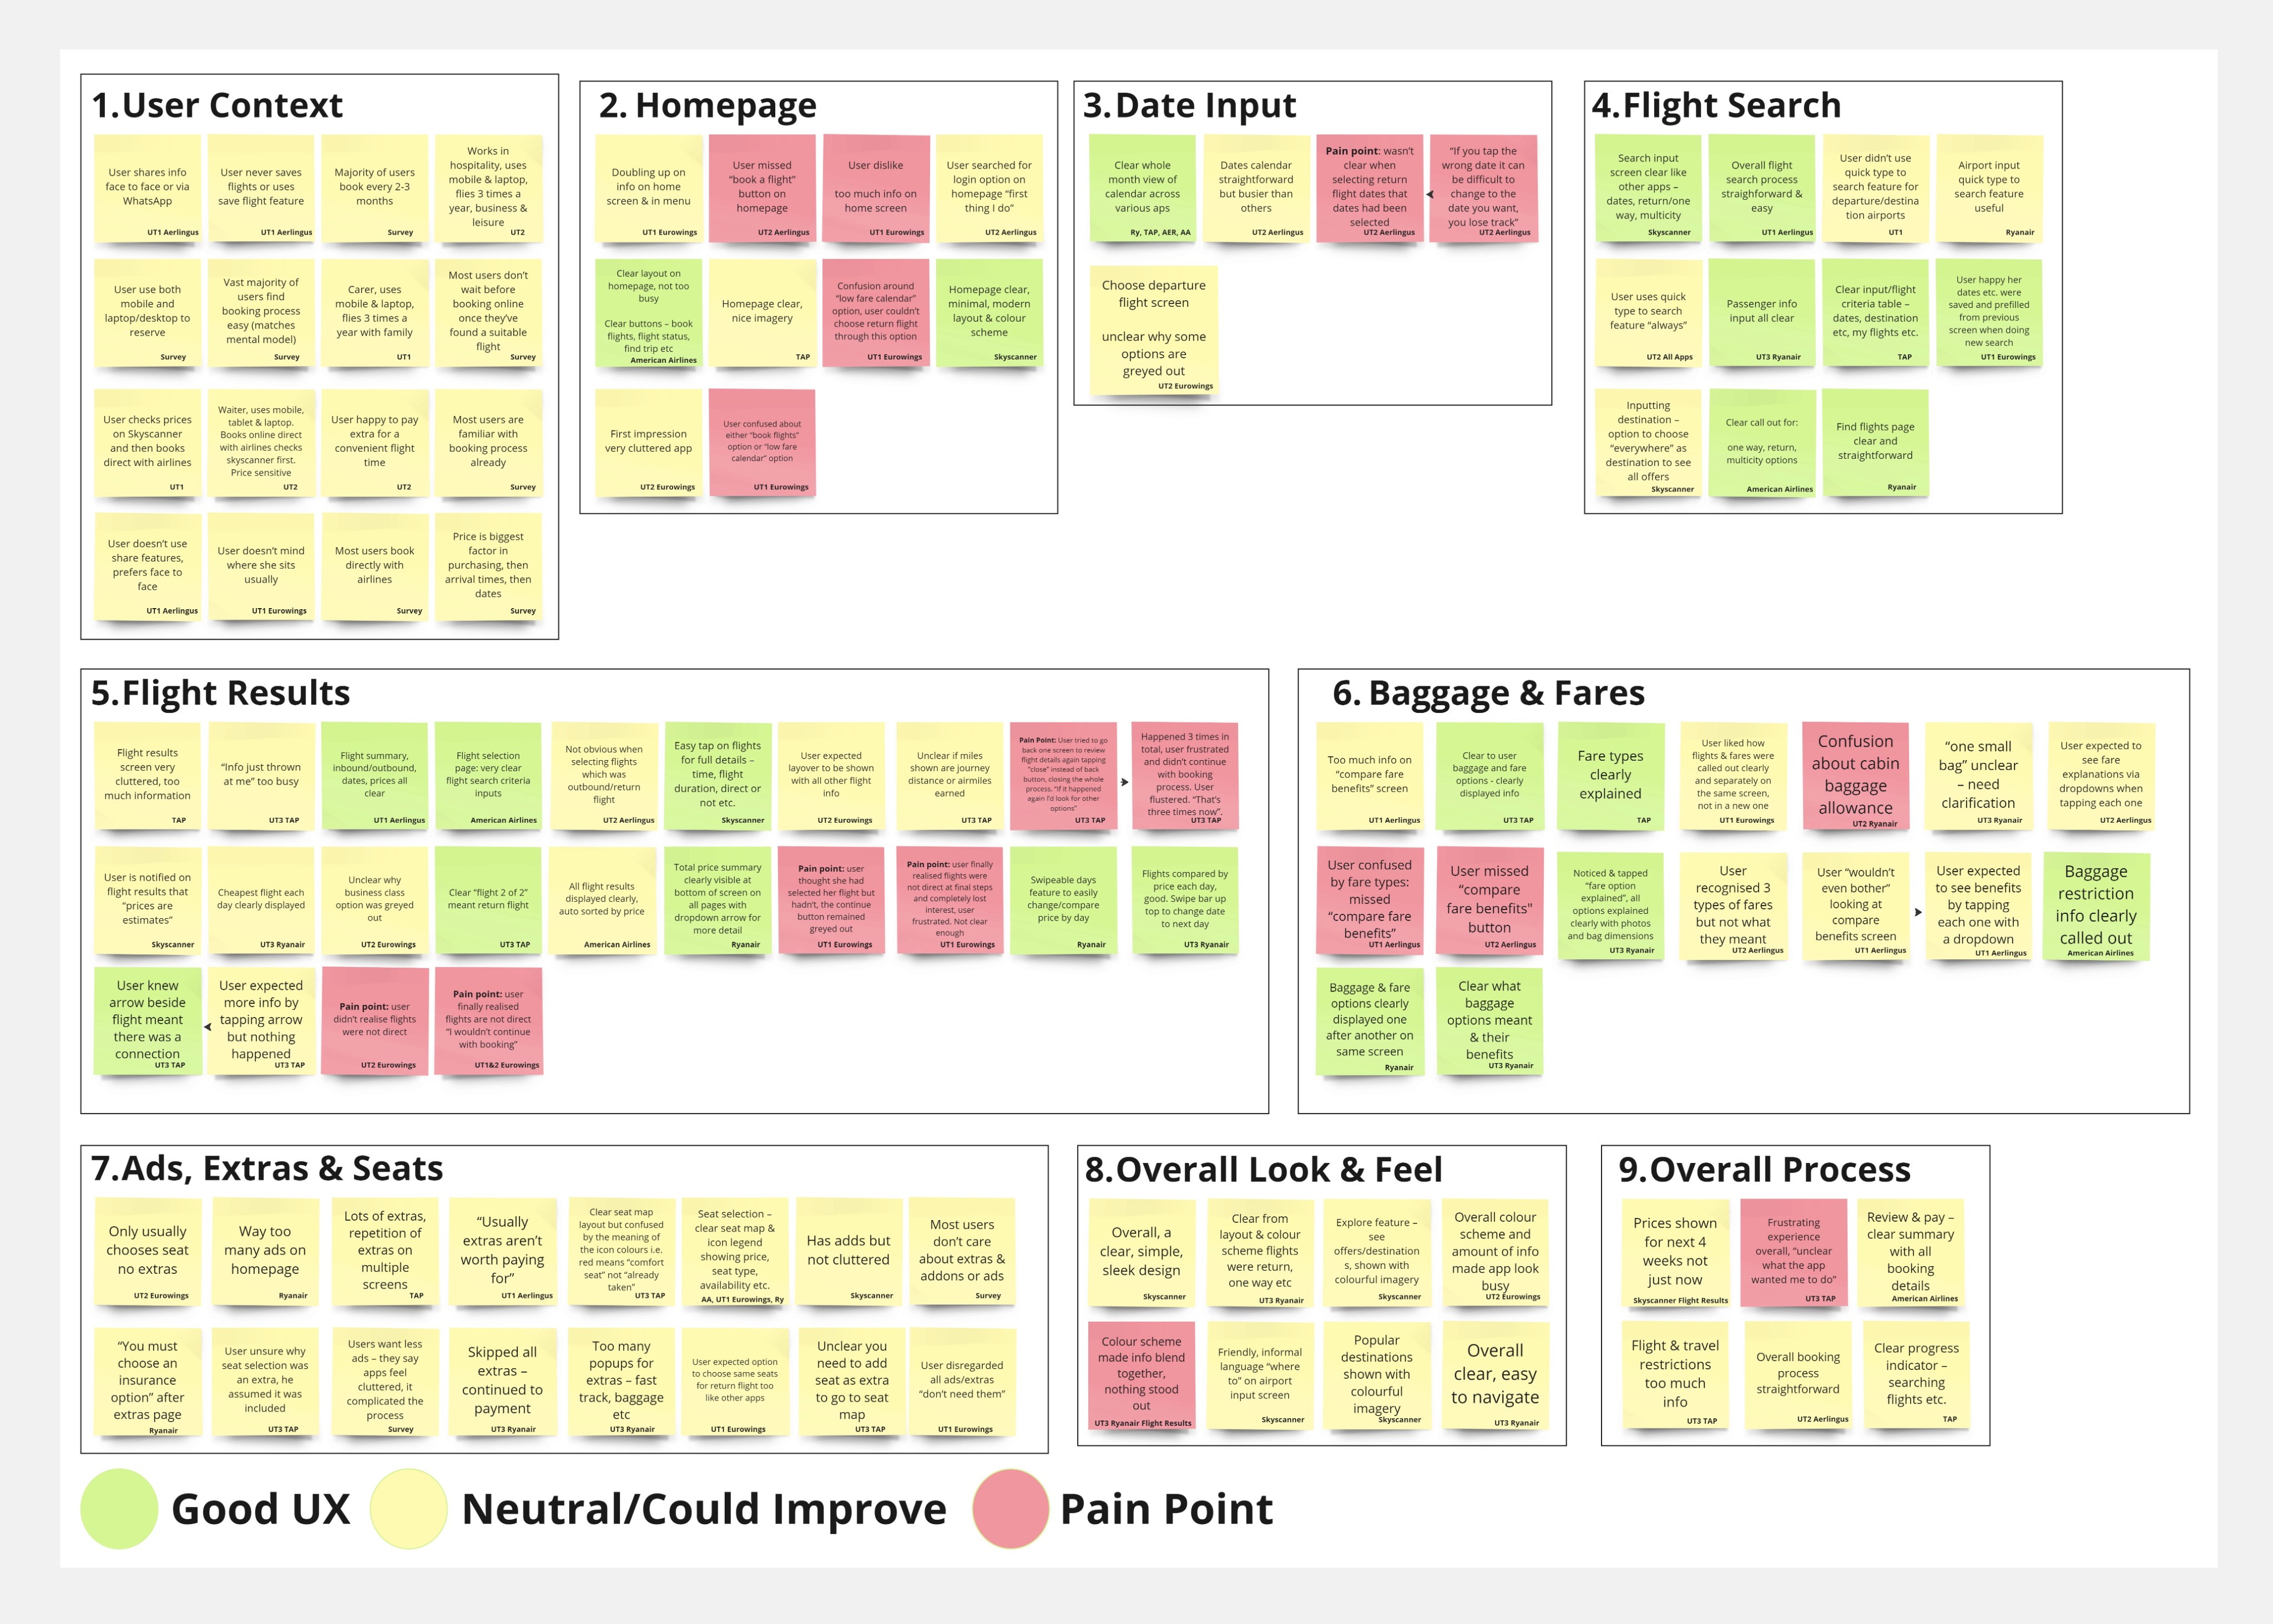
Final affinity diagram
Customer journey map
I then took my groups from the affinity diagram and plotted them on a customer journey map. This visual and structured approach helped pinpoint exactly where problems occurred and where action could be taken. It served as an easy reference during the screen design phase, with all information organized and visually represented in one place.
I mapped the user journey from the moment of travel inspiration to the booking confirmation stage. This helped me understand where issues arose and where improvements could be made. Understanding the user's emotions, goals, behaviours, context, and pain points was essential to triangulating and addressing the problems.
Below were my findings:
Homepage
Cluttered homepage with too many ads and options hindered users from starting a flight search. Not good for business
Flight search
An unclear date input calendar caused confusion about outbound and return dates
Users struggled to change inputted dates when needed
Ambiguities on the flight search screen created friction
Users often missed the "book a flight" option and were confused by a "low fare calendar" button.
Flight results
Users found the flight results screens "too busy," with unnecessary information being overwhelming
Fares, baggage & extras
Fare & baggage option screens, as well as extras & seat selection screens, were overloaded with information and pop-ups, leading to confusion about fare types, baggage allowances, and difficulties in understanding the seat selection map screen.
Functionality & navigation
The back button functionality did not work correctly, causing users to be taken back to the start of the entire process rather than just one screen back. This required them to re-input their search criteria, leading to user frustration, drop-offs, and lost sales.

Design
User flow diagram
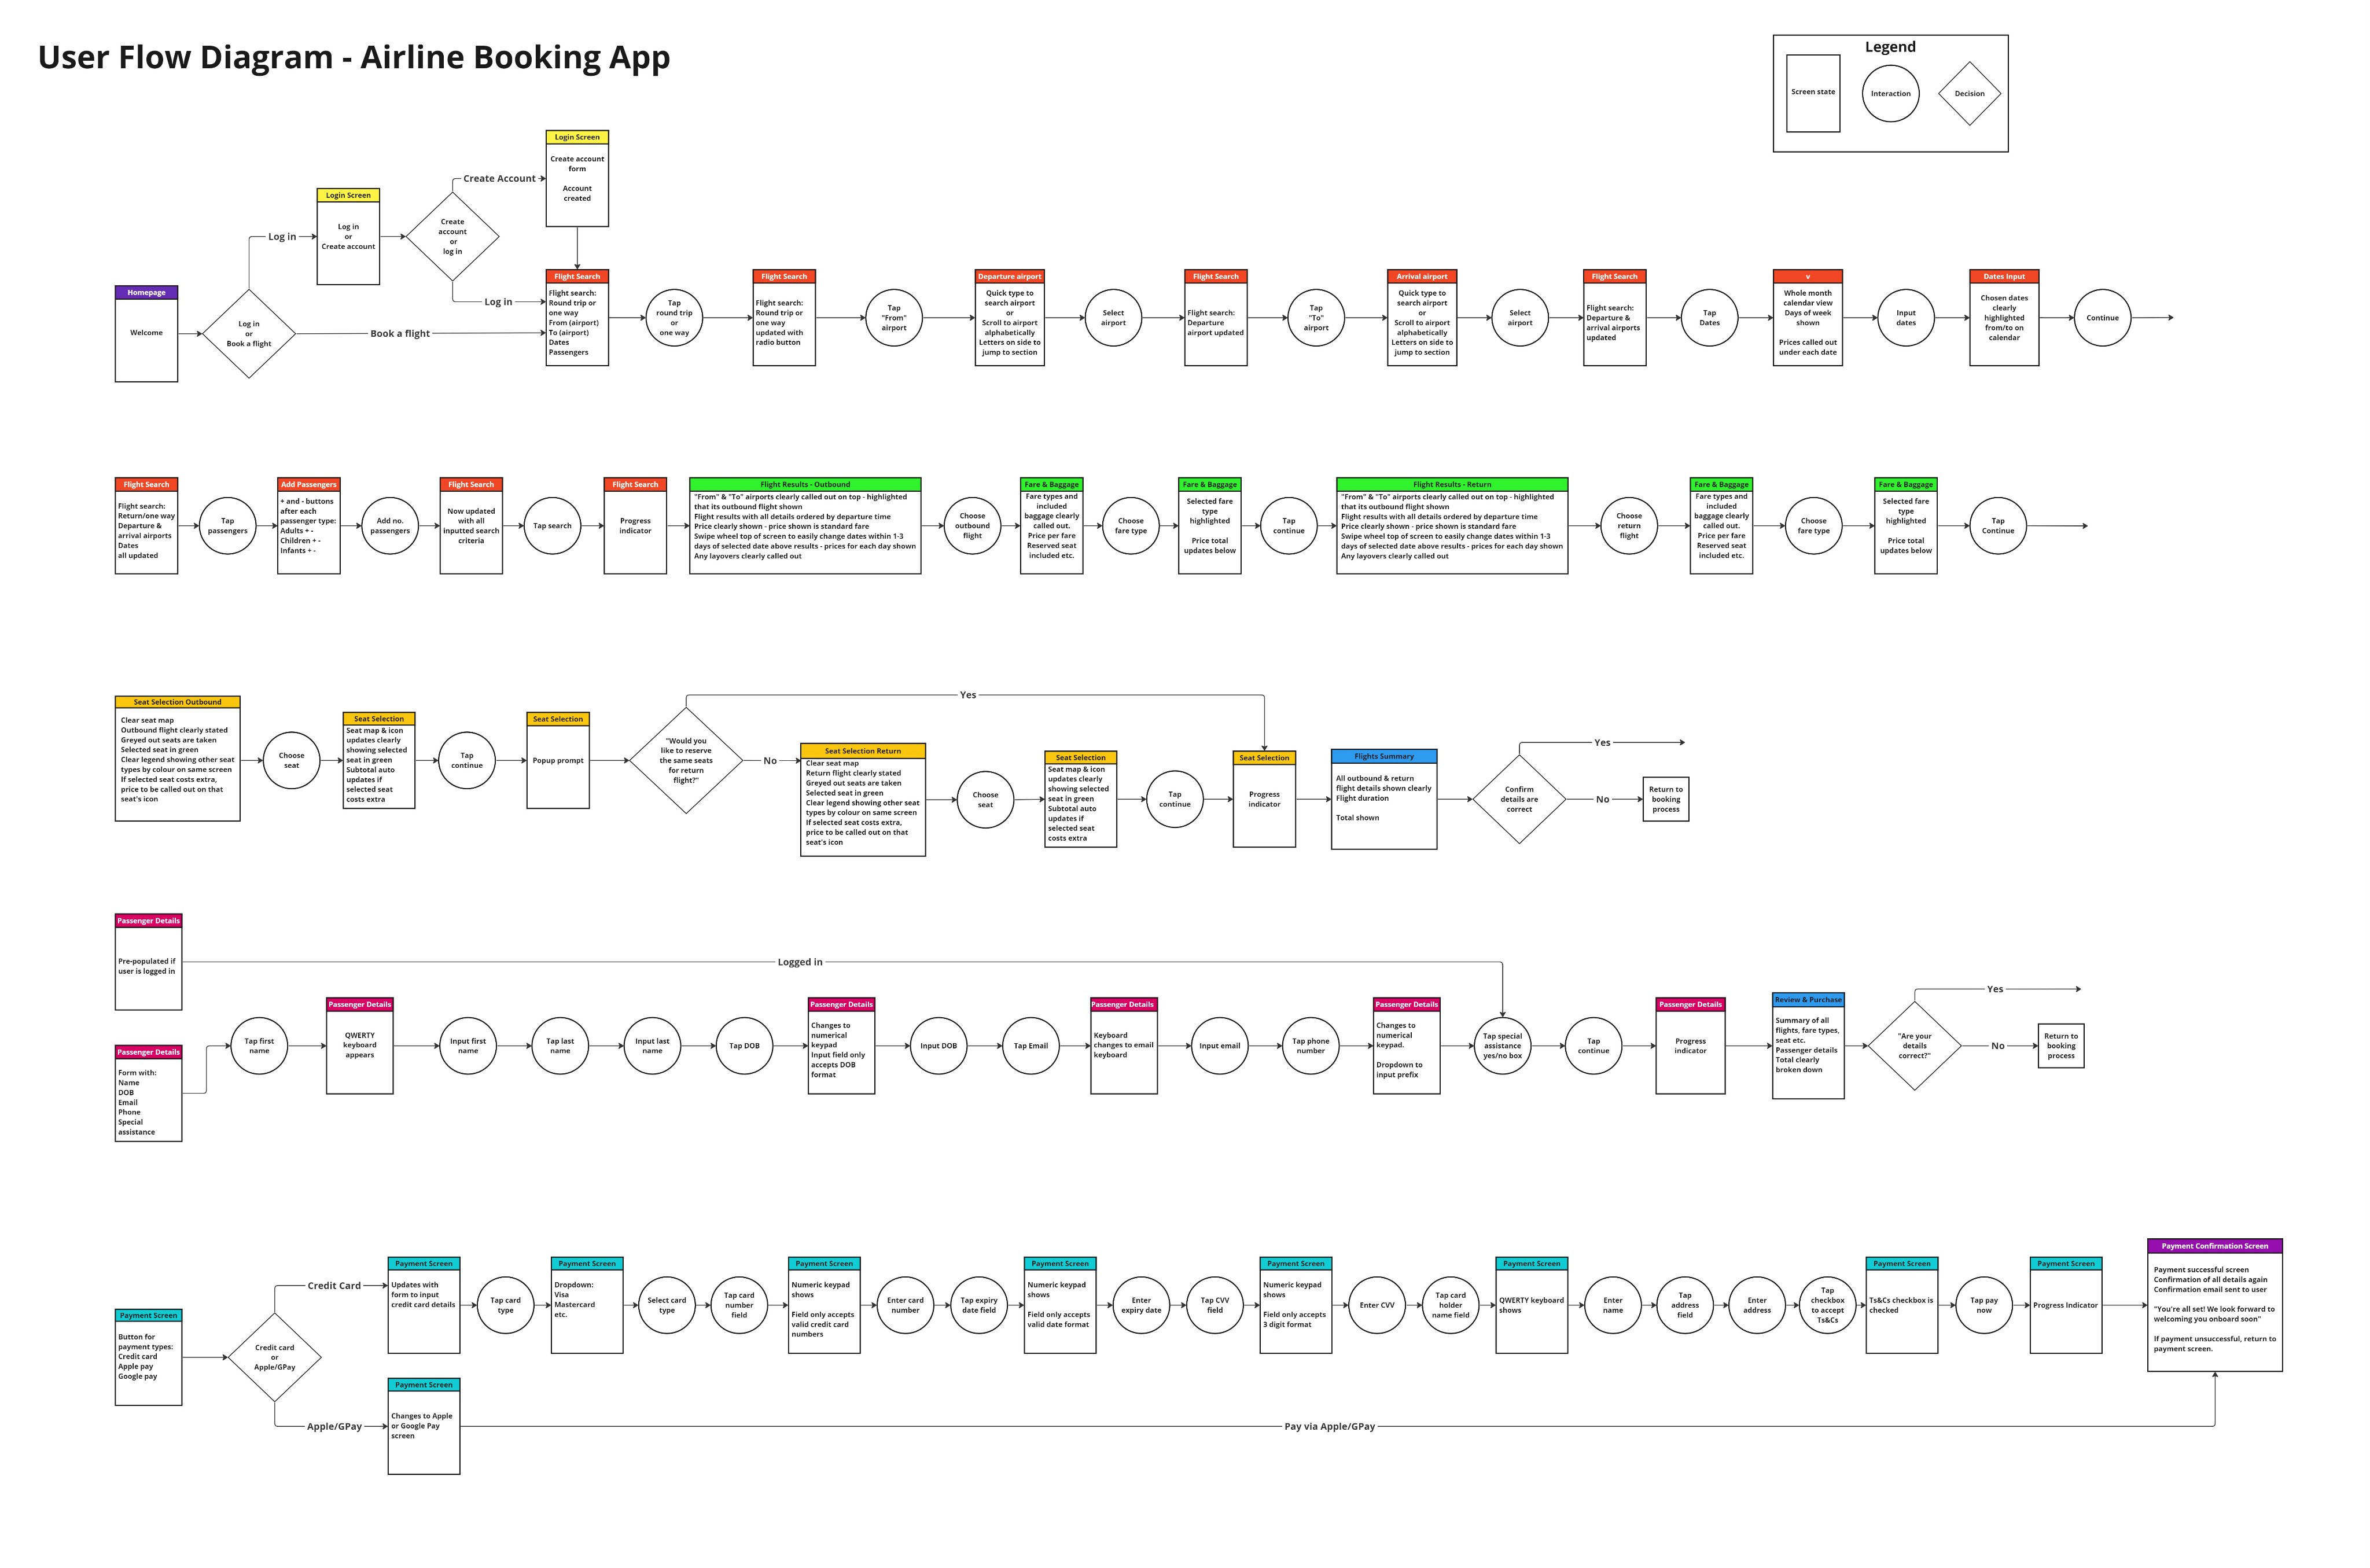
Having identified the issues to address, I began mapping the user flow for my design solution. While I had a rough idea initially, this step proved crucial in creating a clear and streamlined flow. It involved multiple iterations and careful consideration of how I wanted the flow to function. Mapping everything out in Miro enabled me to analyse the flow, eliminate unnecessary steps and screens, and refine the user experience.
I divided the overall user flow into subflows based on my research data: homepage, flight search, flight results, seat selection, flight summary, passenger details, final review, payment, and booking confirmation. I used colour coding and icons to differentiate between subflows, screen states, user interactions, and decisions. Each screen was detailed with its intended content and functionalities.
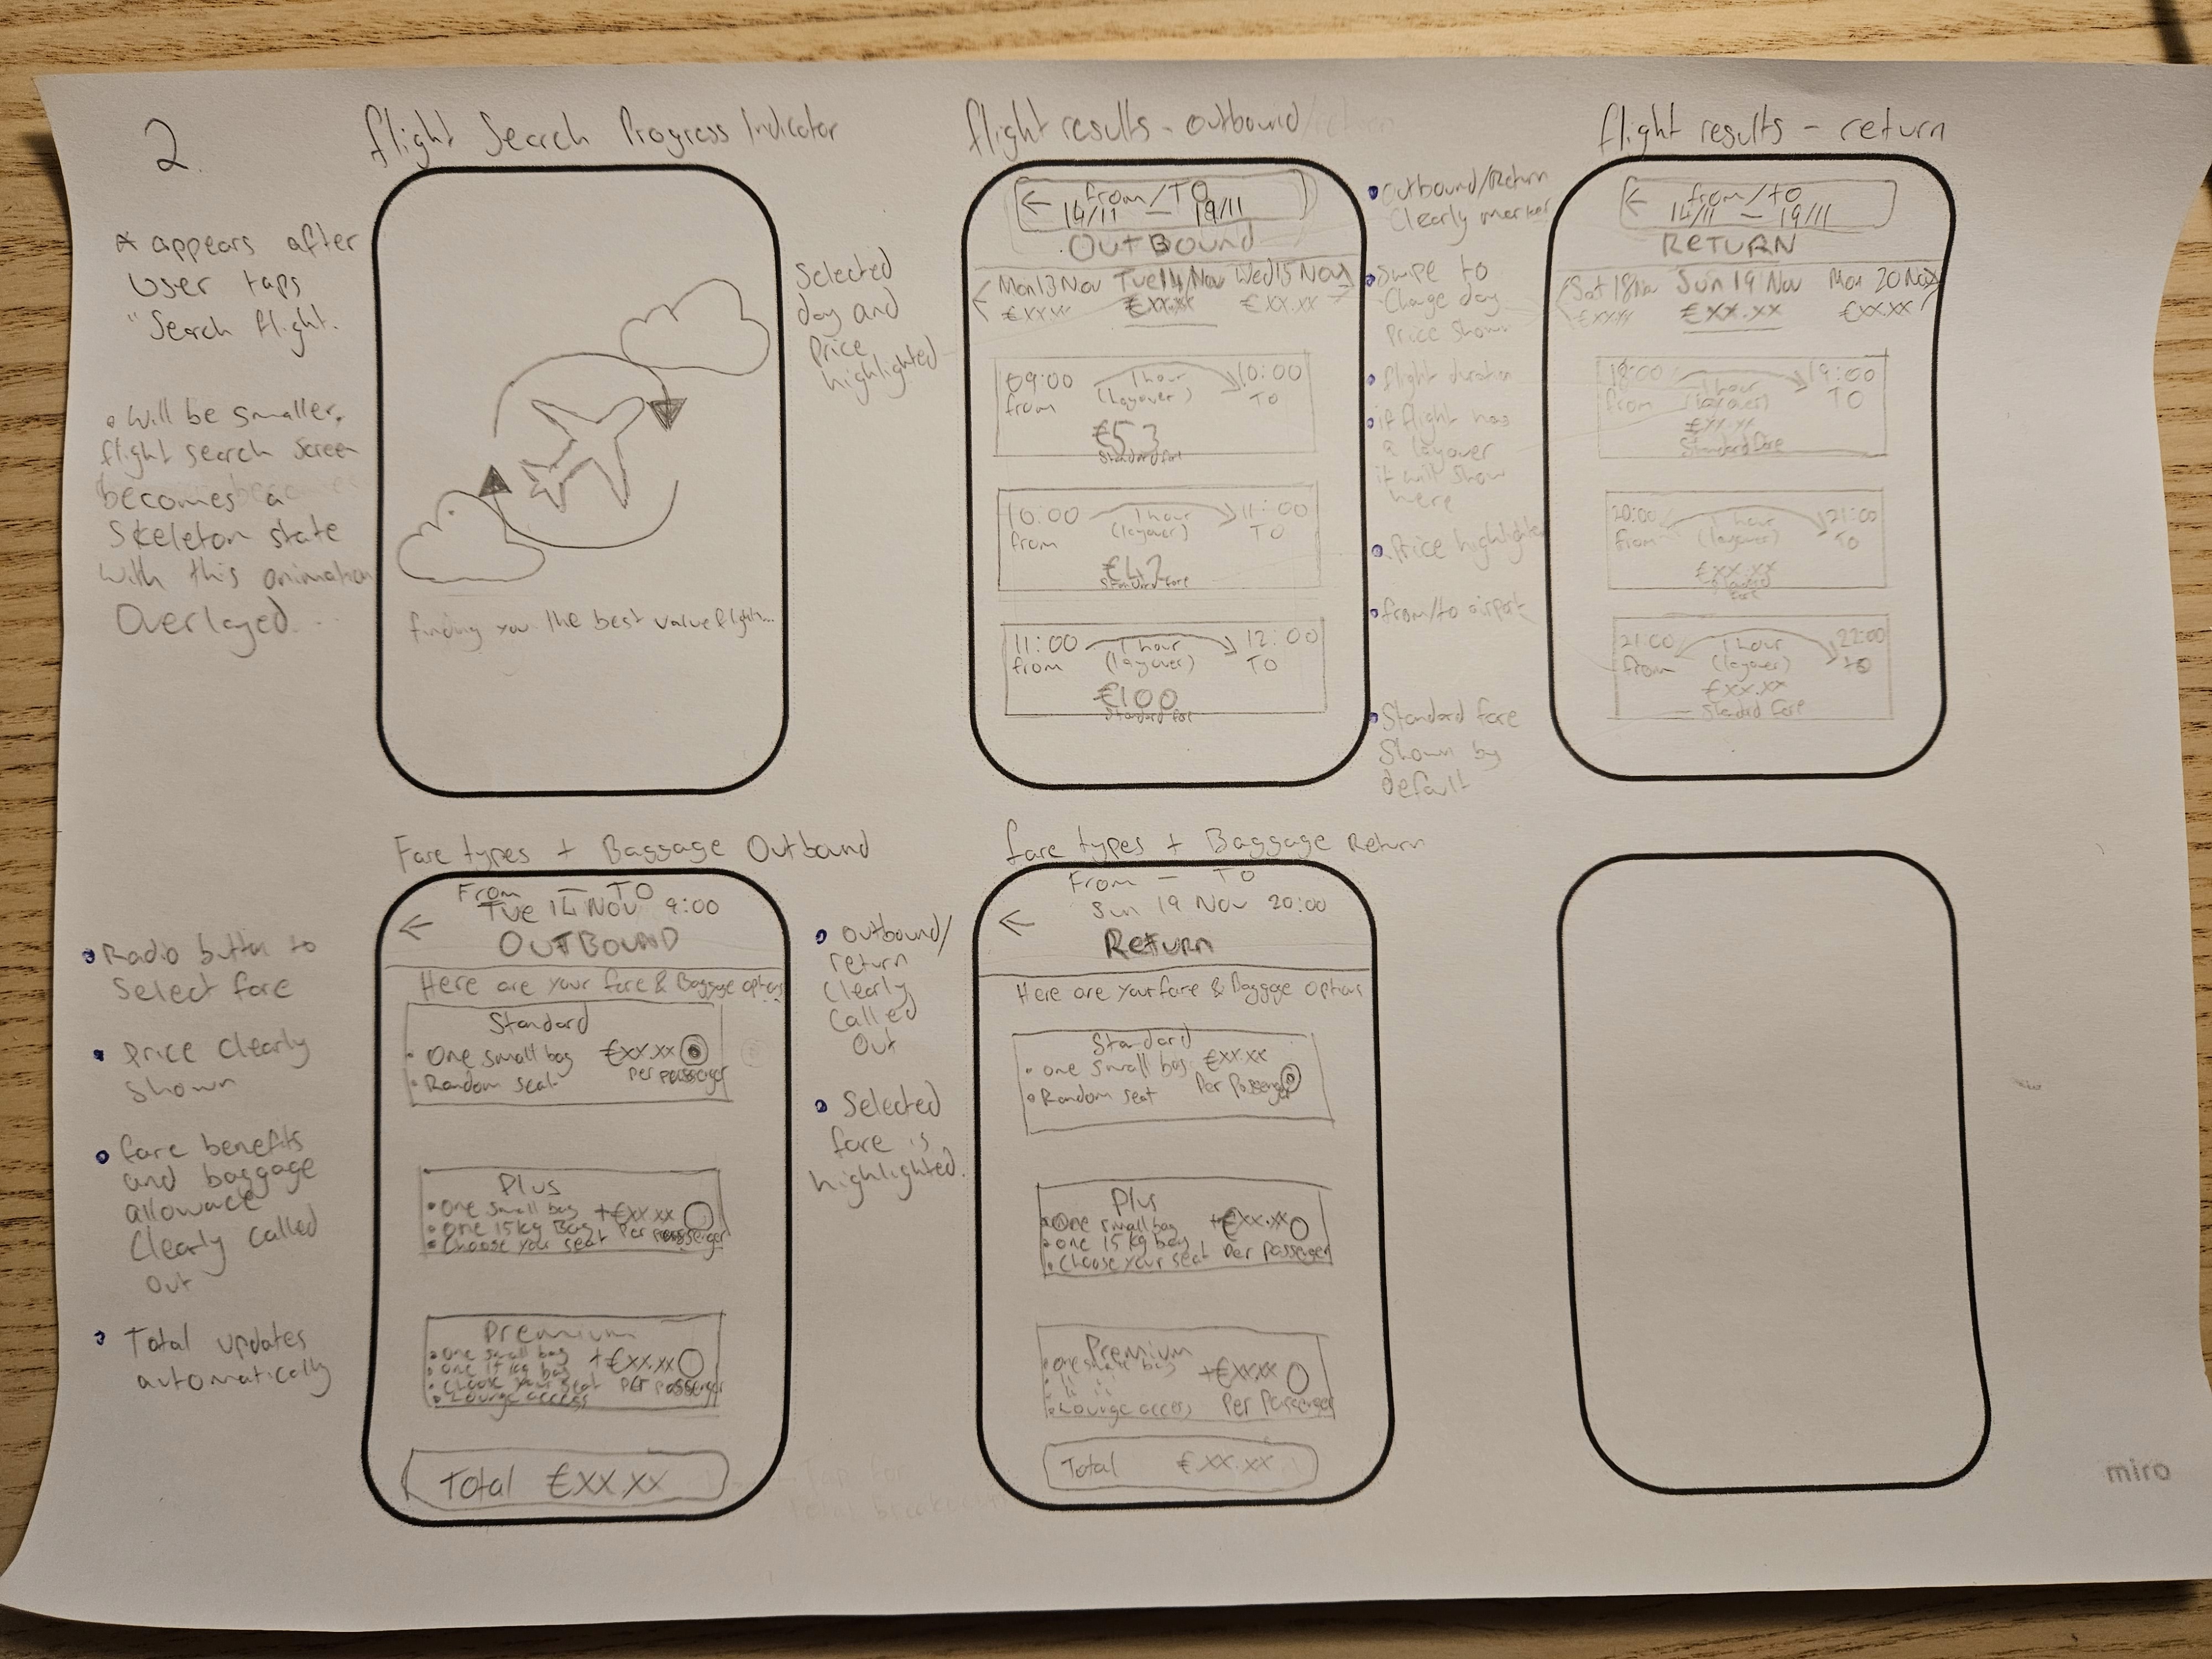
Sketches
Sketching enabled me to dive deeper into my proposed flow and begin visualizing my screens. Referencing my user flow diagram, I drew each screen by hand in pencil. This phase allowed me to experiment with various layouts while adhering to established conventions and standards. After numerous revisions, tweaks, and trial & error, I settled on versions of the screens and layouts that met my satisfaction, along with a clear vision for design elements to incorporate.
These sketches formed the foundational framework of my design, which I would refine further in higher fidelity using Figma.
This process showed me the importance of wireframing, as it revealed that many ideas that seemed promising initially did not translate well on paper.
Wireframing & UI Design
I found this part of the process the most enjoyable — being able to thrash it out & think logically about each screen, interaction, and design element to achieve a final design and prototype, complete with developer handover annotations.
Here, I combined my marketing background with UX principles, focusing on language use, CTAs, layouts, colour schemes, visual hierarchy, heuristics, and conventions. My goal was to create a minimalist design that streamlined usability while maintaining a modern aesthetic in medium fidelity.
With the problems identified, I began shaping the actual screens of my solution. I started with creating a wireframe skeleton and then progressed to a more detailed UI design.
I focused on the following points to enhance user-friendliness, declutter screens, and avoid information overload:
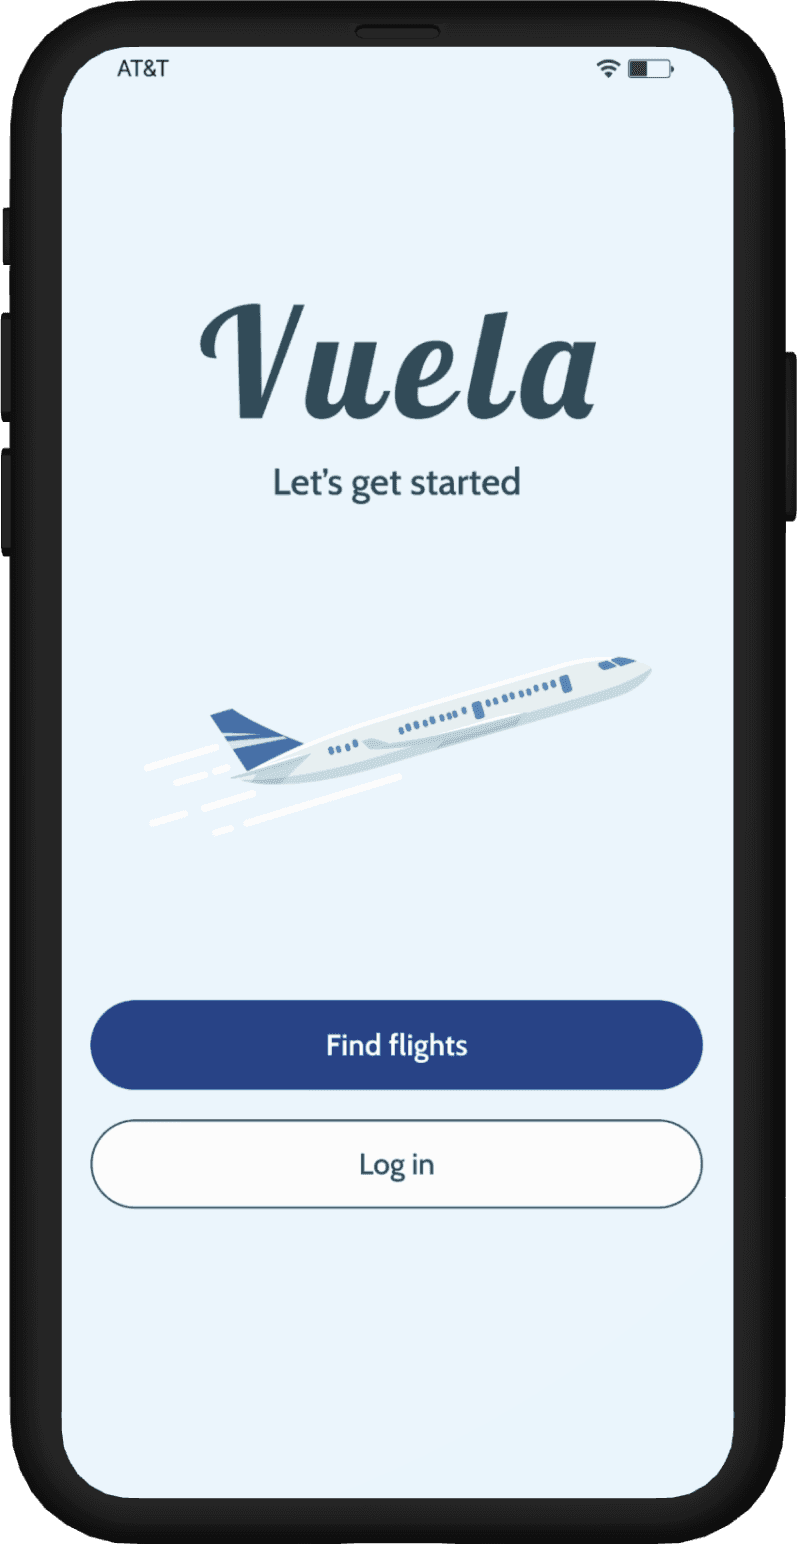
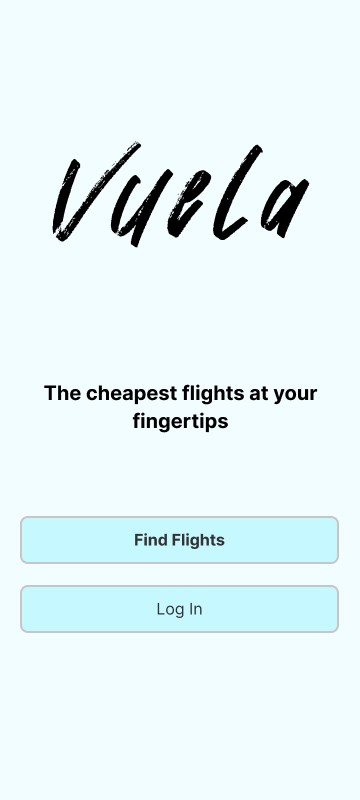
Homepage
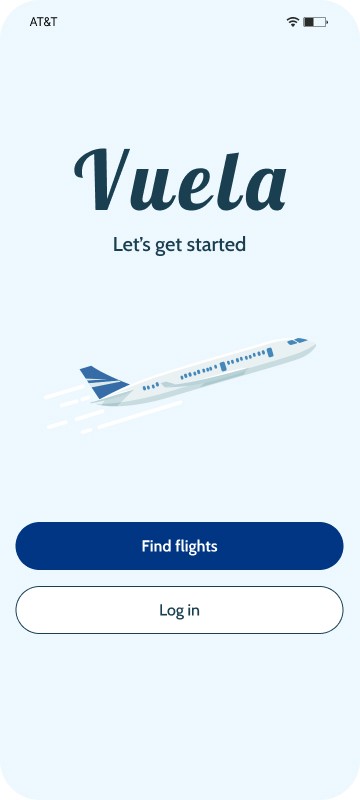
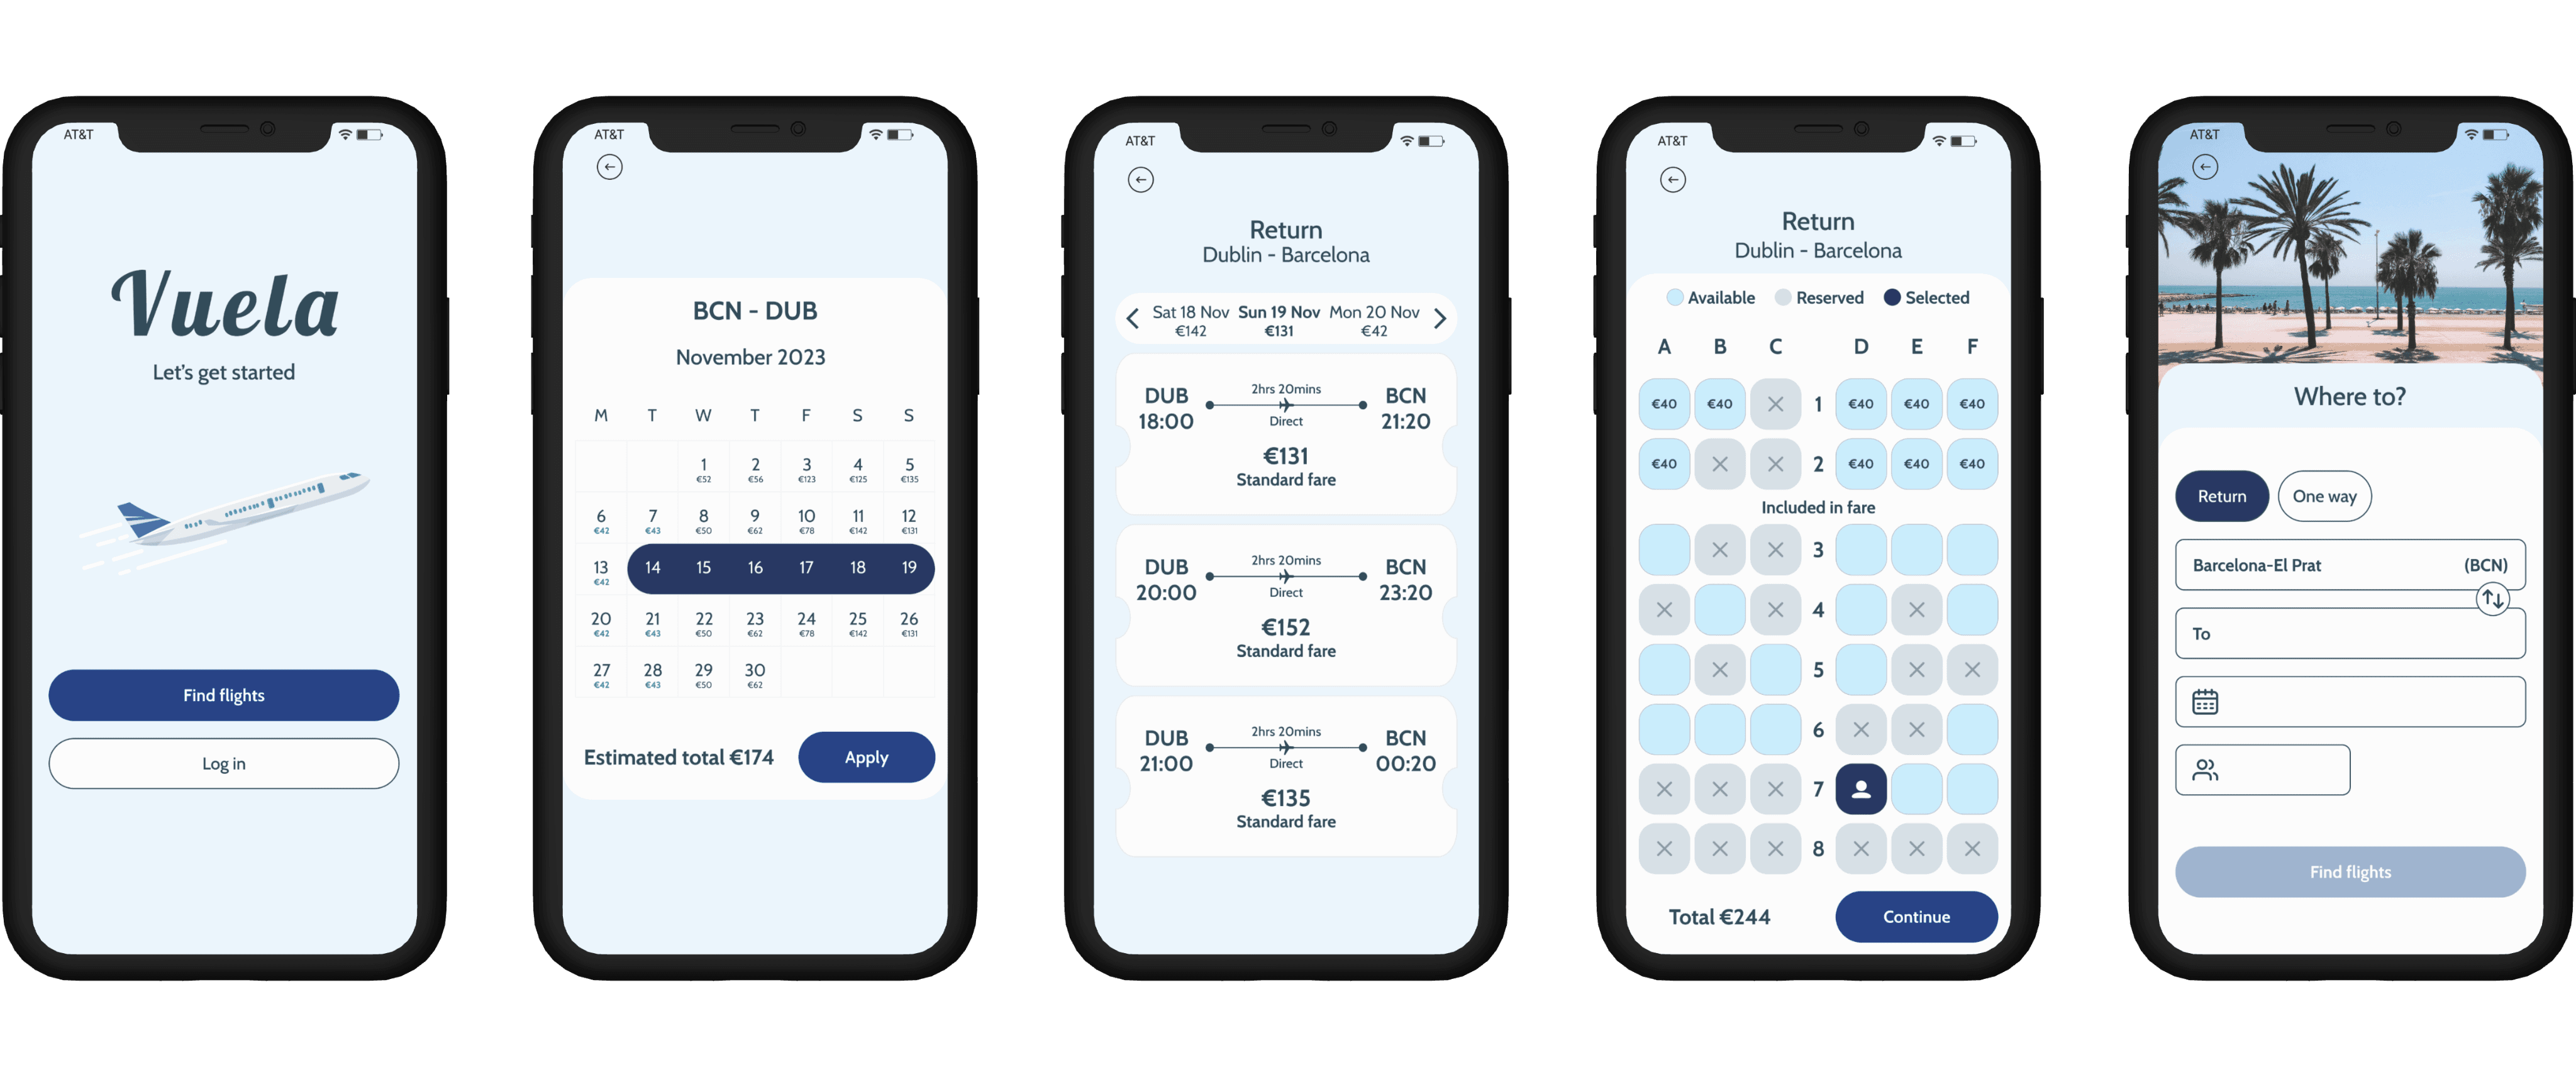
Declutter the homepage leaving only two options - "find a flight" & "log in"
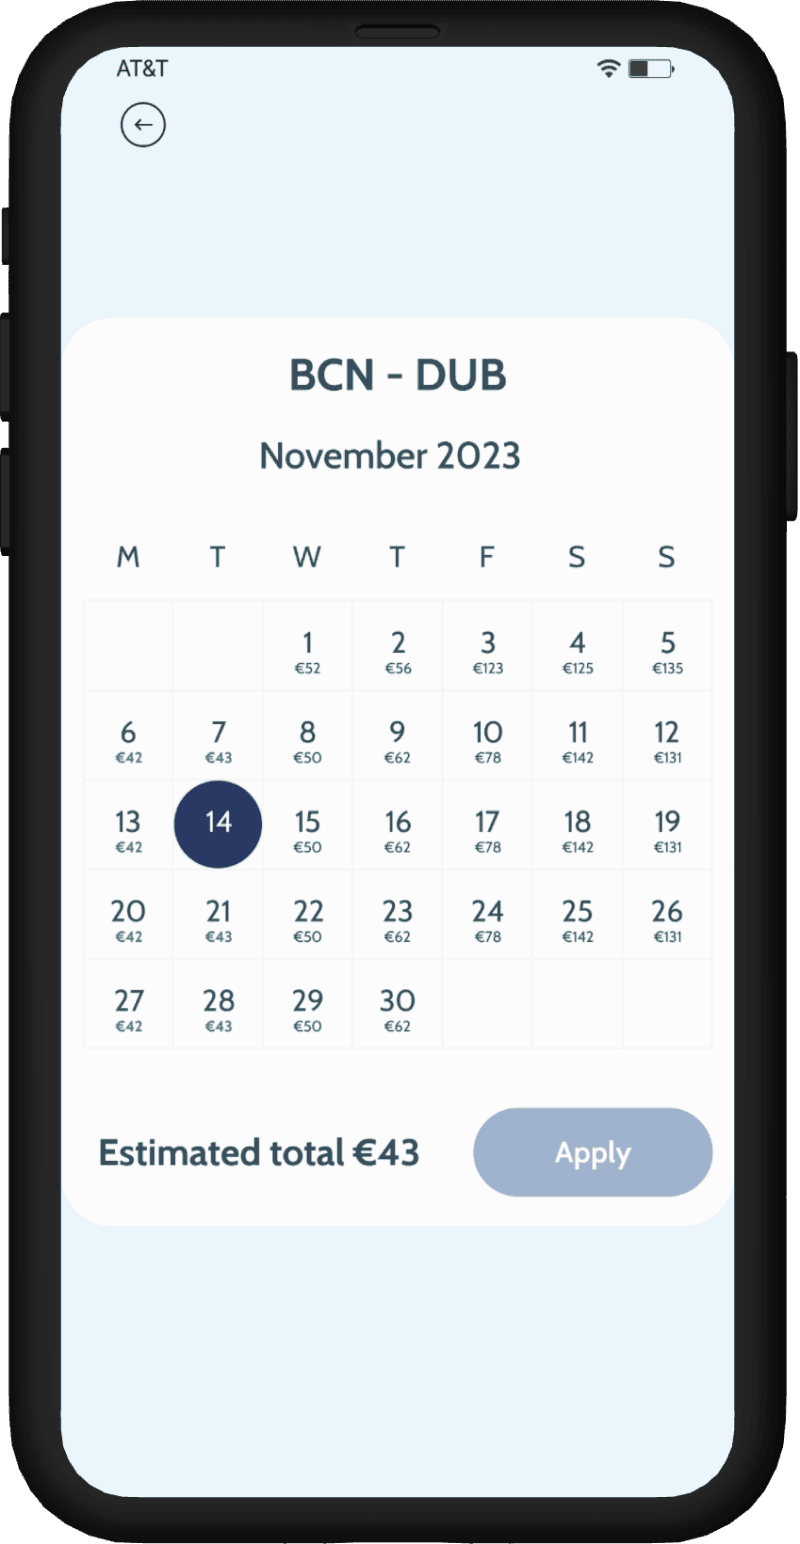
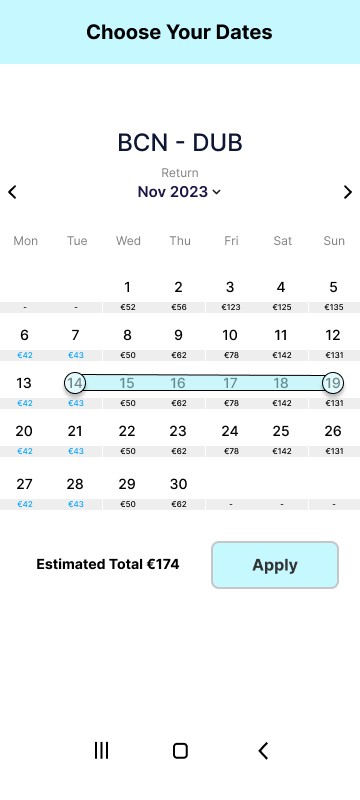
Flight search
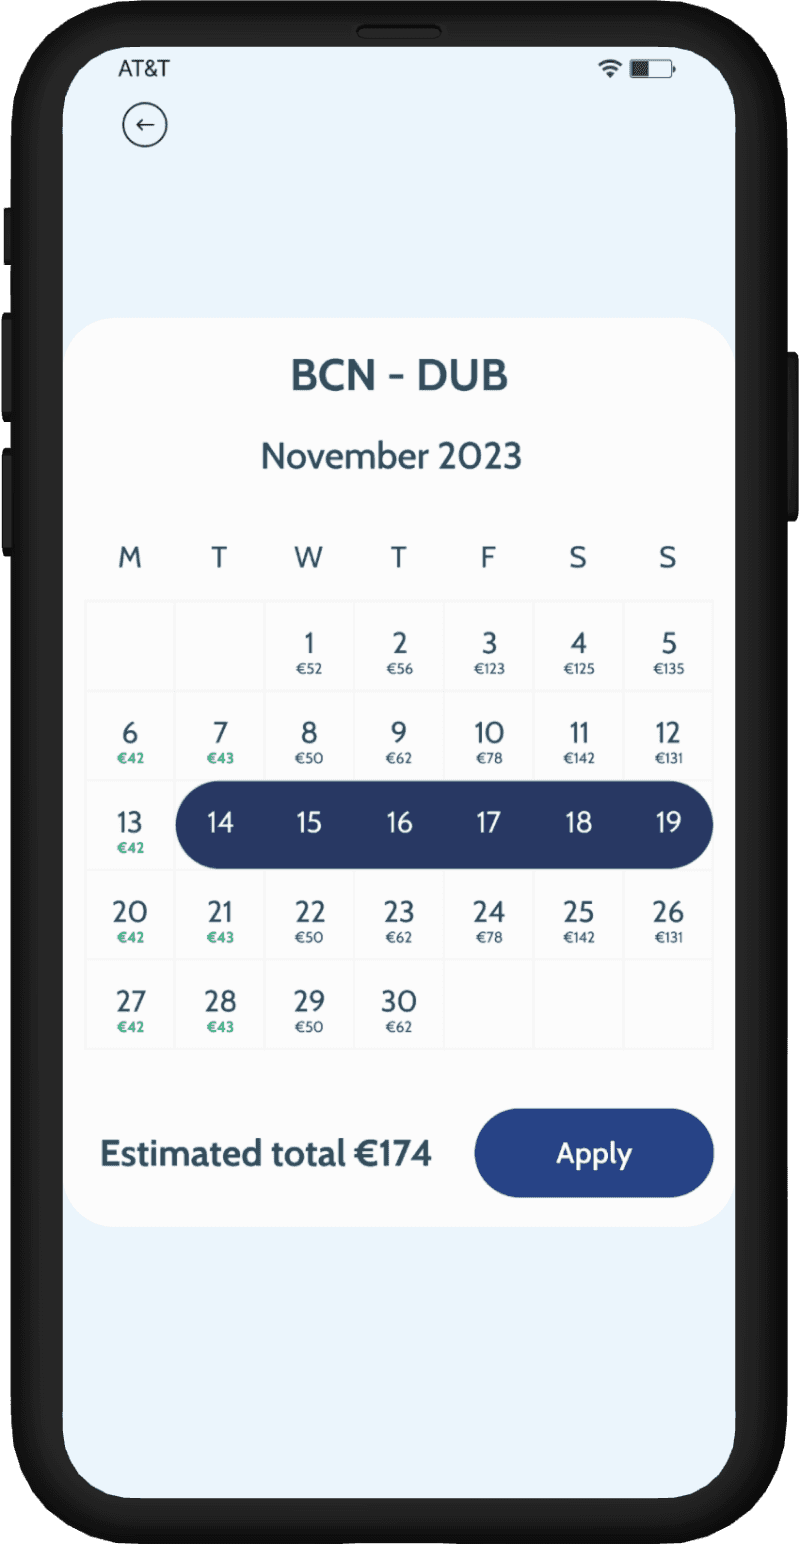
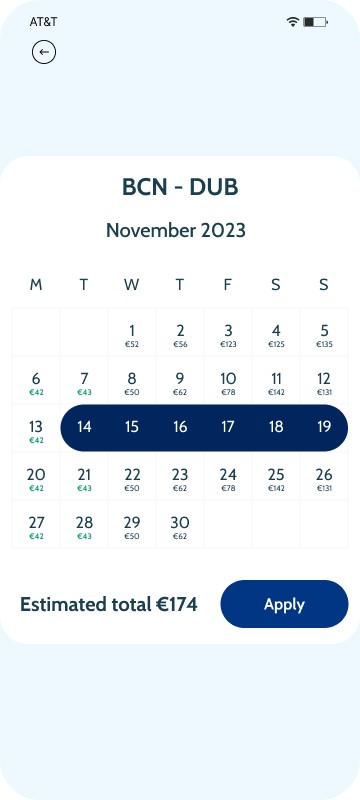
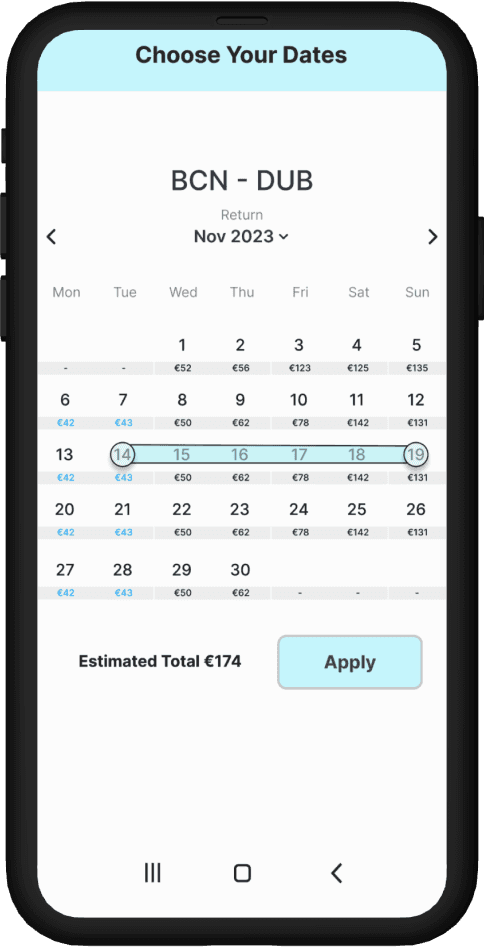
Date Selection Calendar Screen Design: Develop a calendar interface that prominently highlights selected dates and enables easy date adjustments
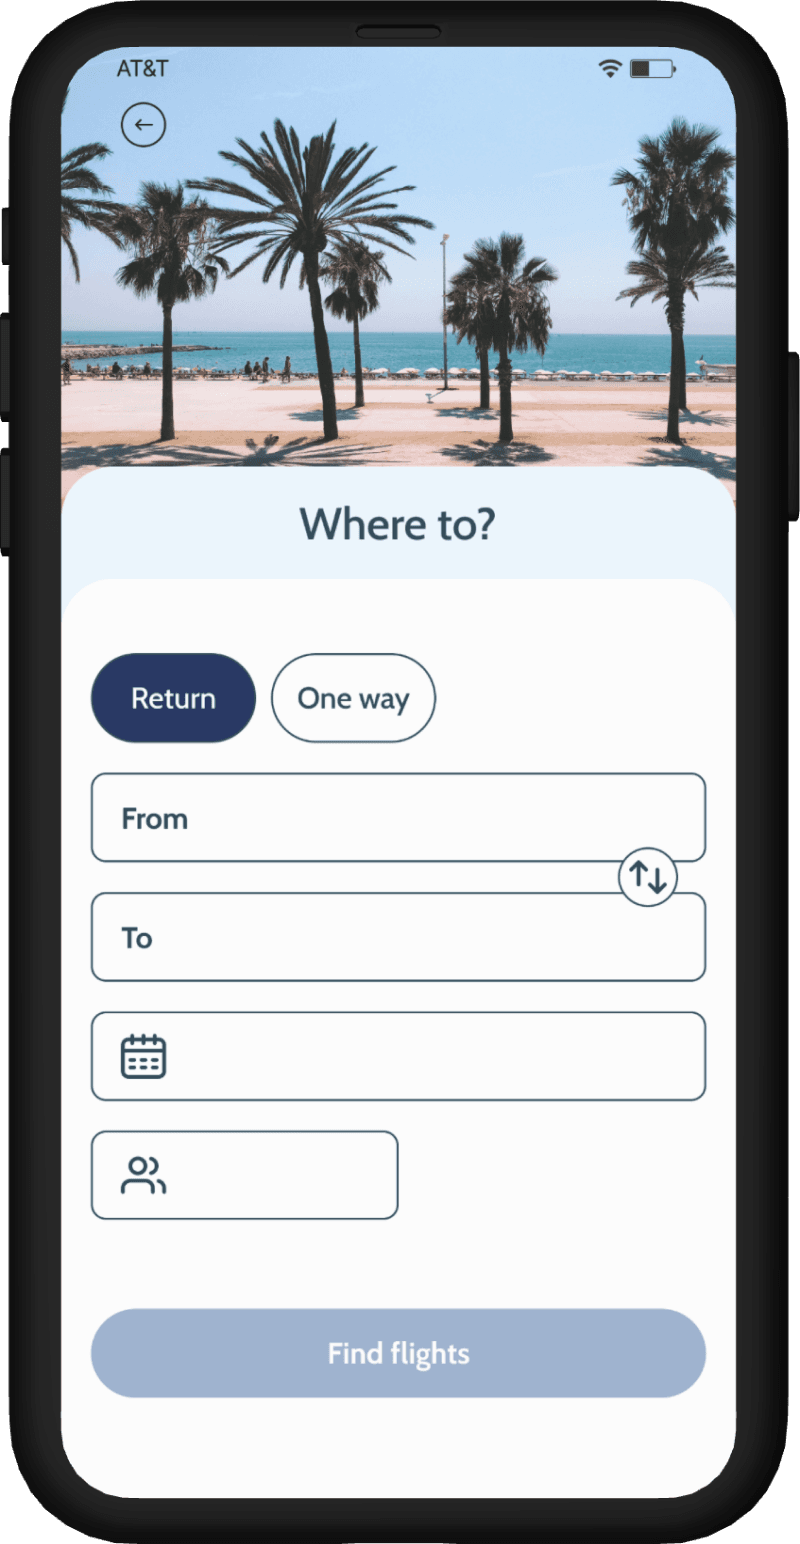
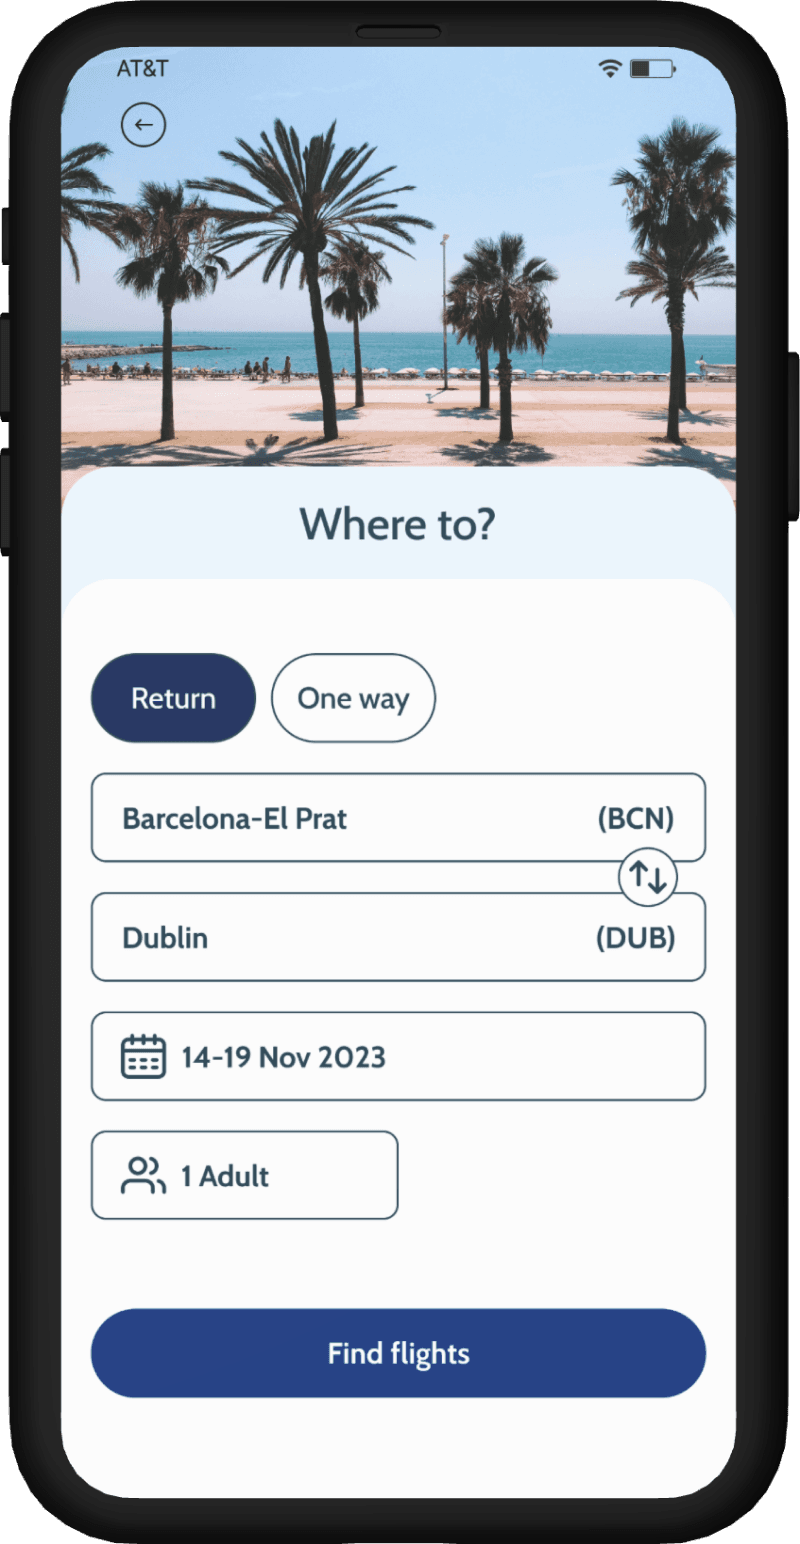
Straightforward Flight Search Screen Creation: Design an intuitive interface where users can input search criteria quickly and with minimal effort.
Flight results
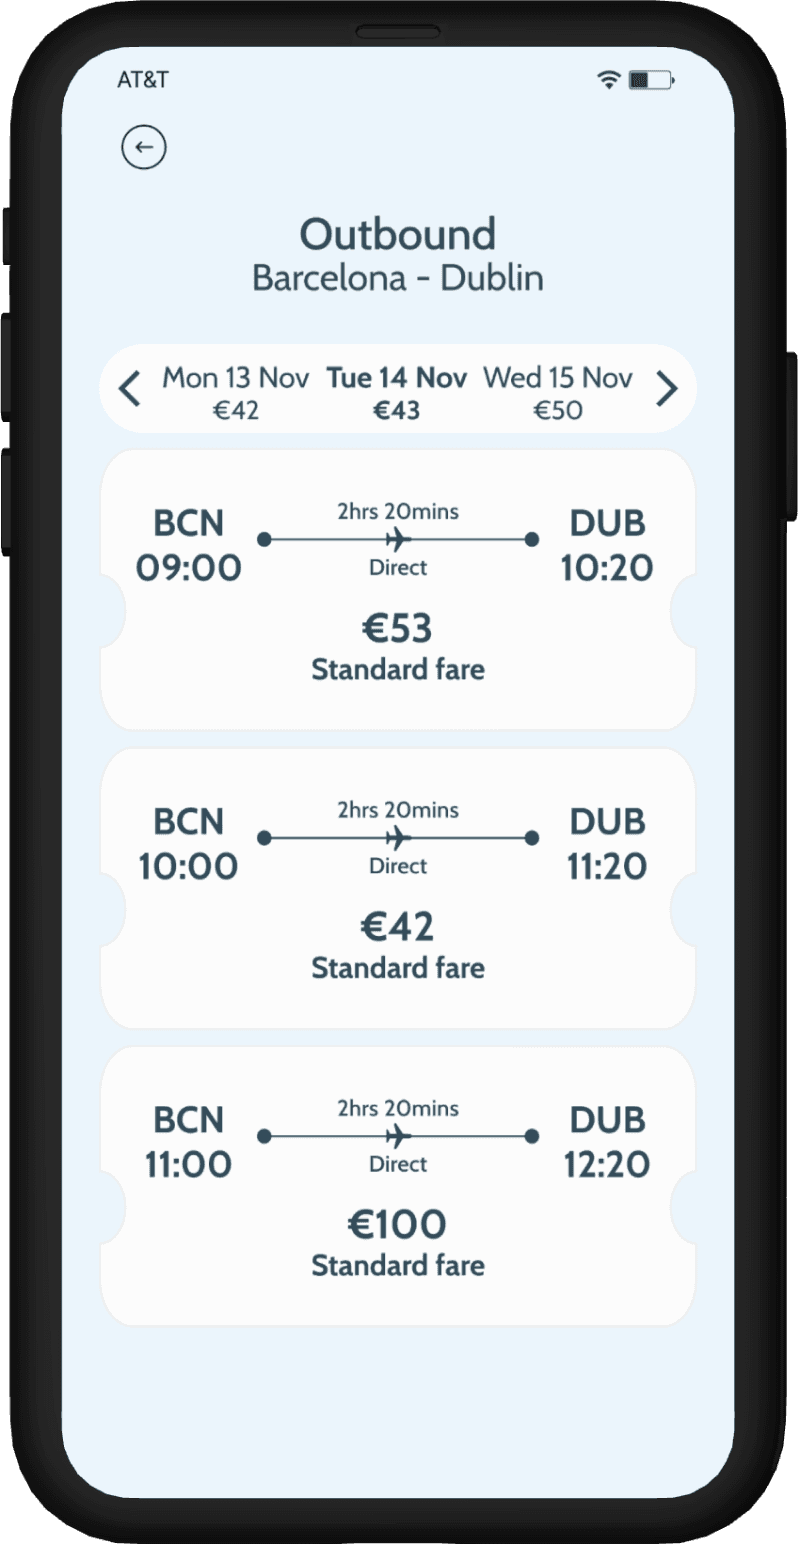
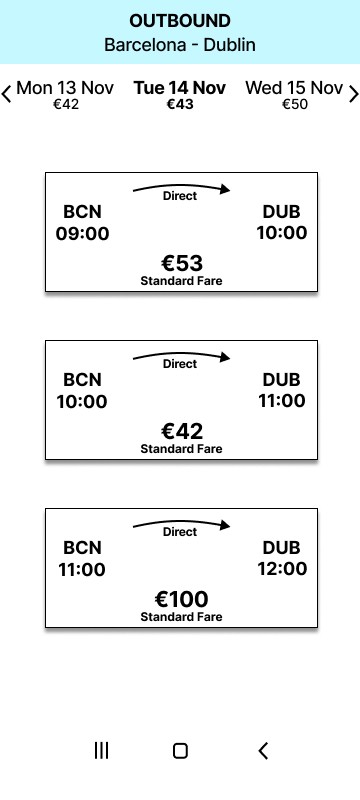
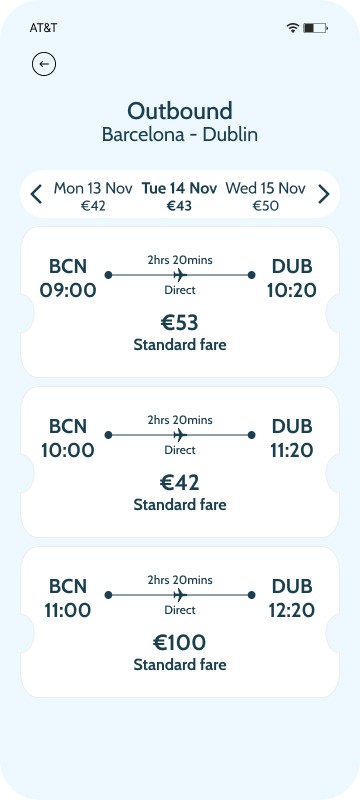
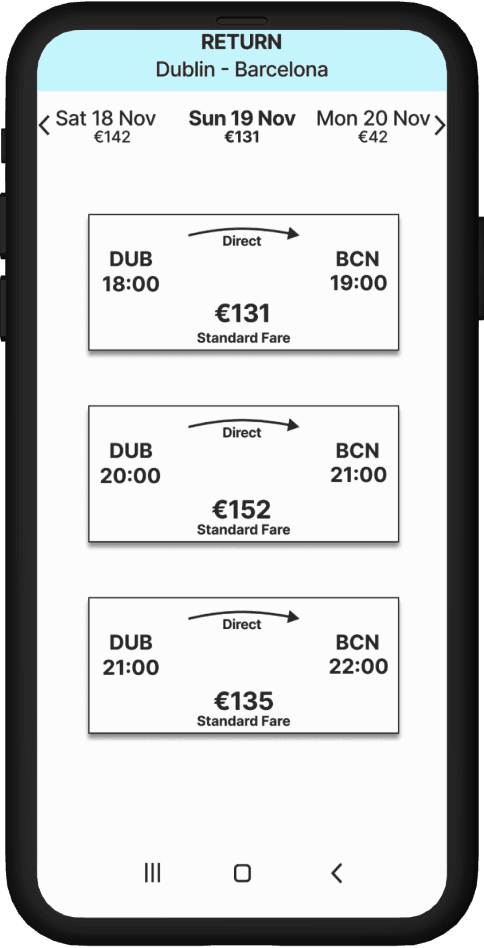
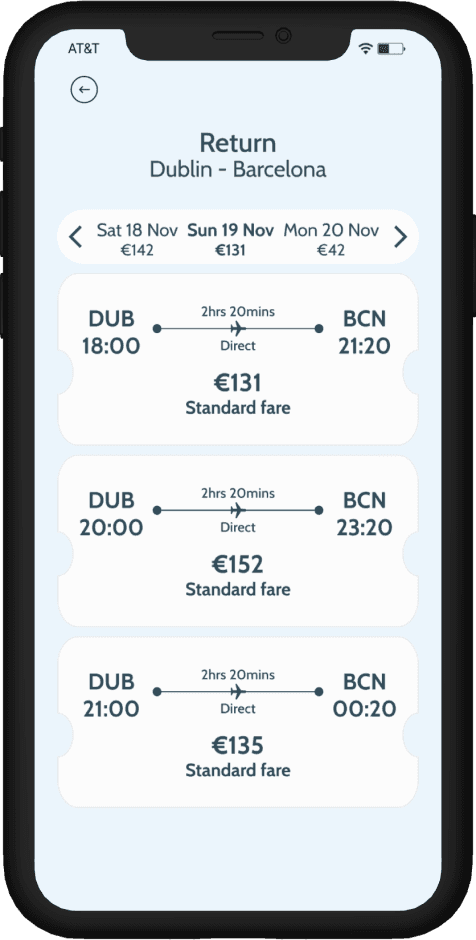
Flight Search Results Display: Show flight details prominently on tiles, including date and time, price, flight direction (outbound or return), origin and destination airports, and layover information.
Convenient Date Scroll Feature: Include a top element in flight search results for easily scrolling to change dates within 3 days of the displayed results date, with prices highlighted for each day.
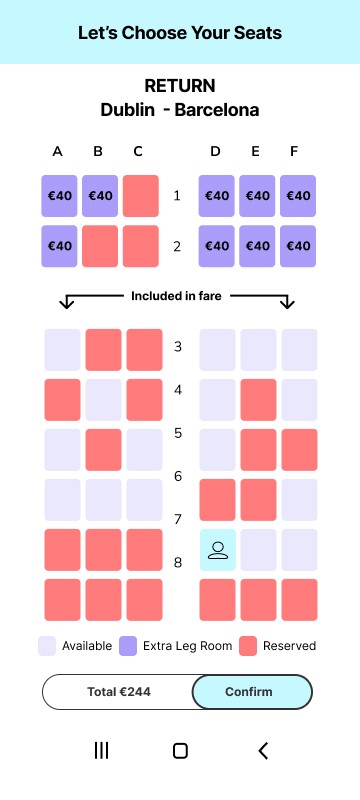
Fares & seats, baggage & extras
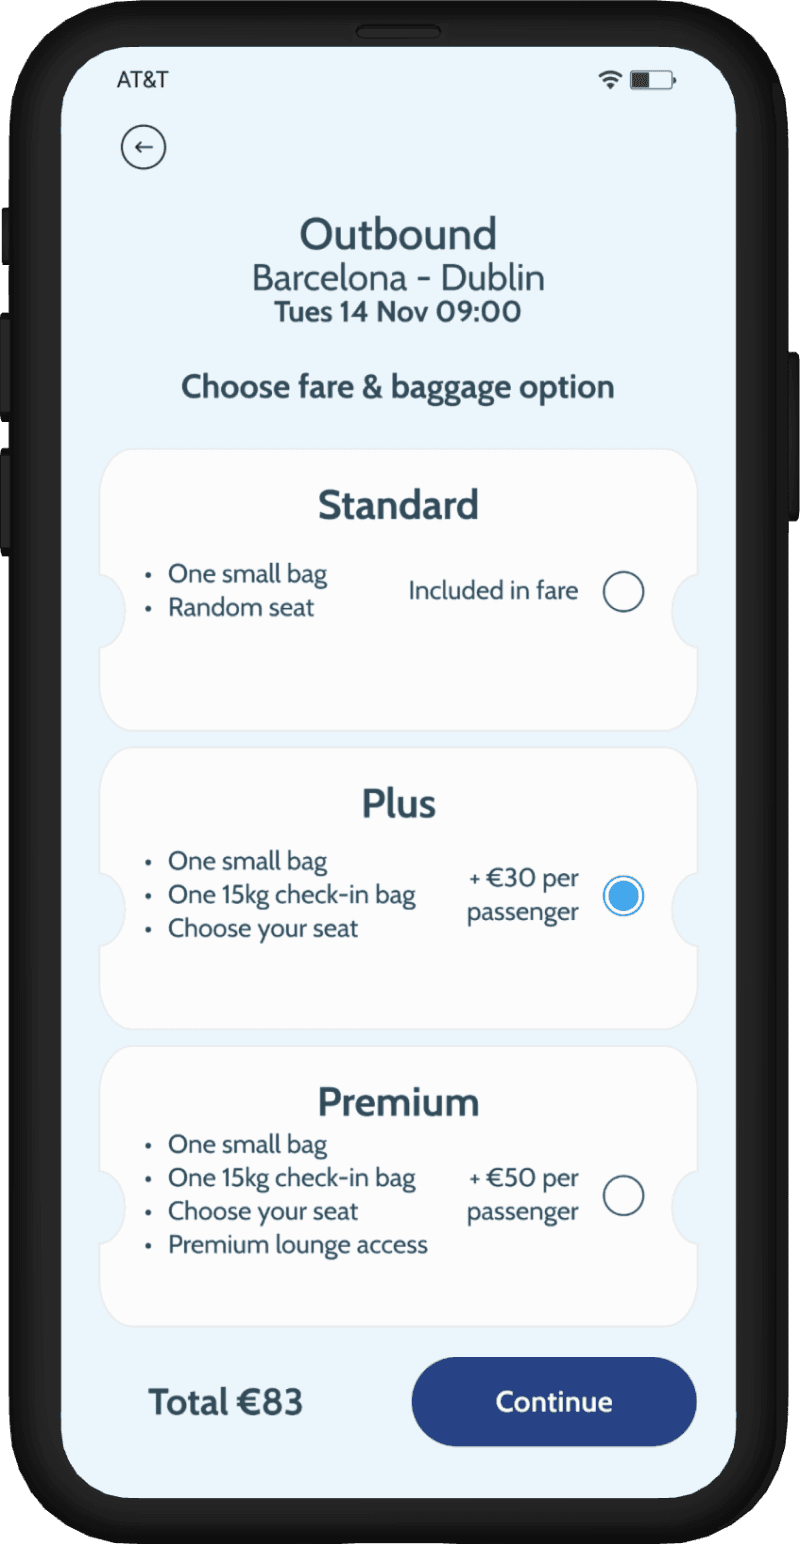
Fare & Baggage Options: Present fare and baggage options on tiles, clearly indicating associated benefits, allowances, and any additional costs.
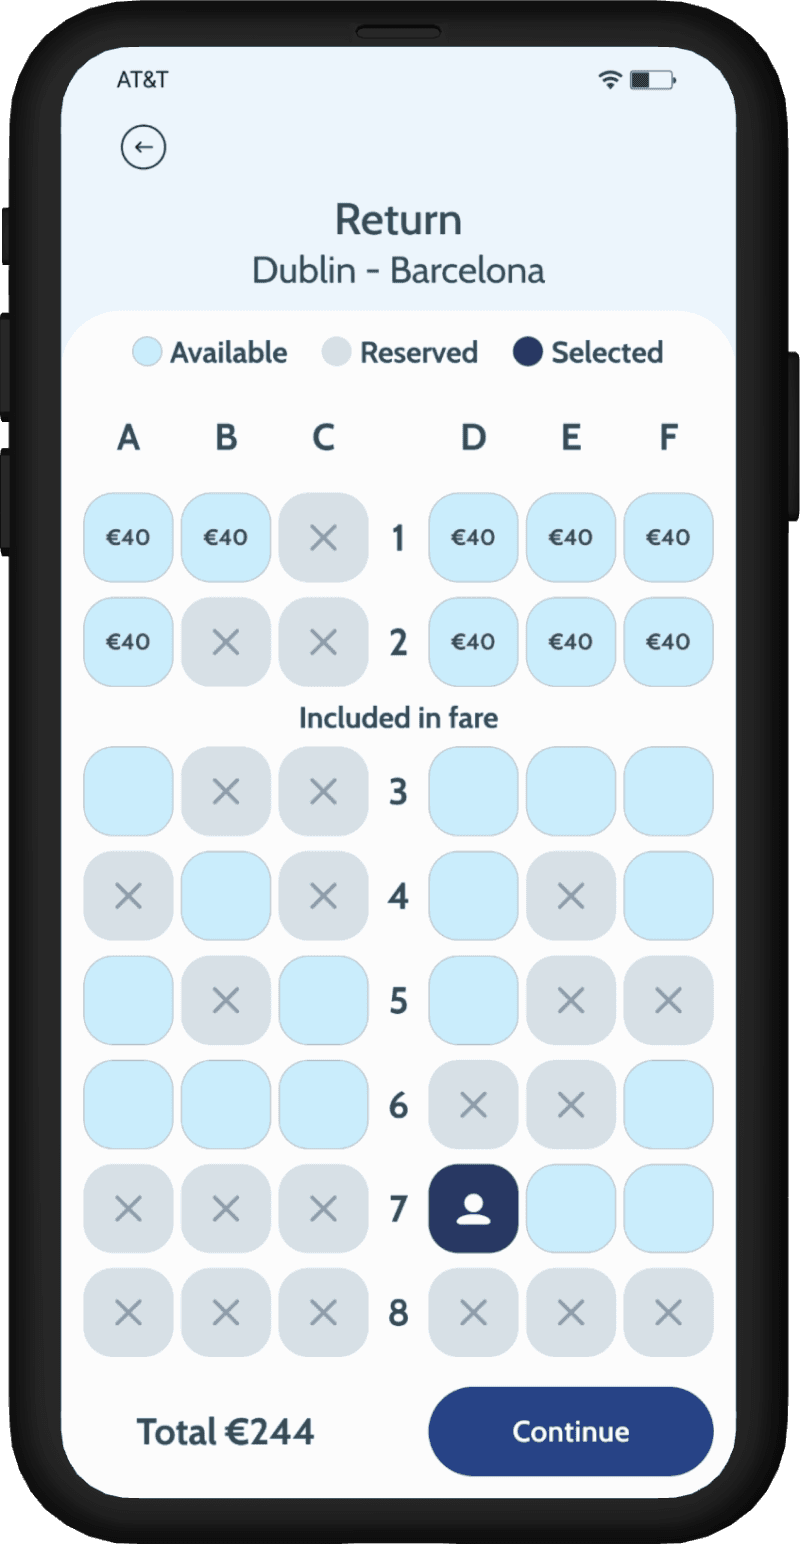
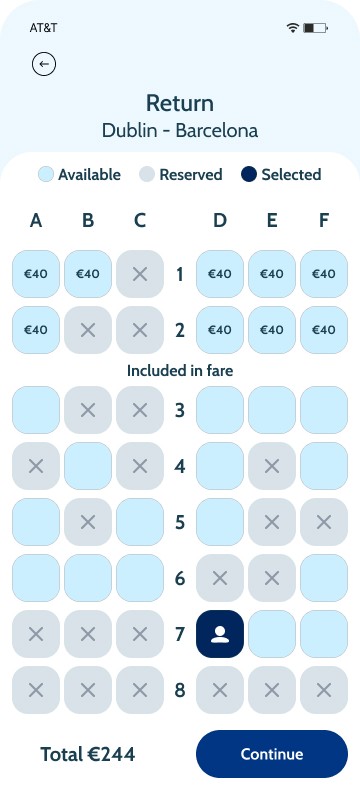
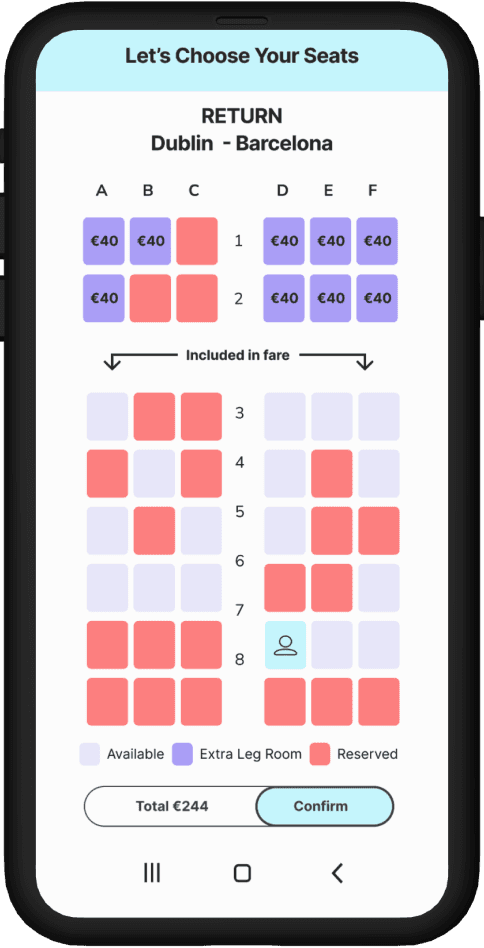
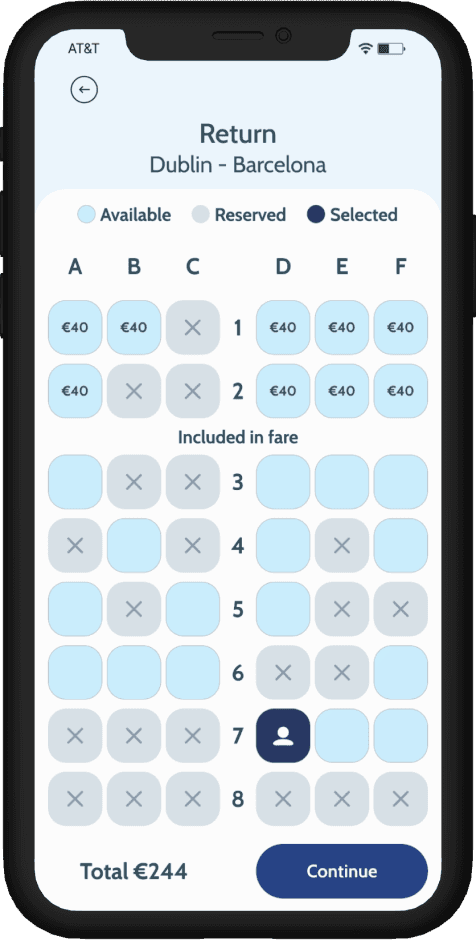
Seat Selection Map: Design a straightforward seat selection map with a clear legend that shows seat availability and if seats are included in the selected fare or not
Minimize Pop-ups & Ads: Restrict the number of pop-ups and ads to avoid distractions
Flight summary & payment
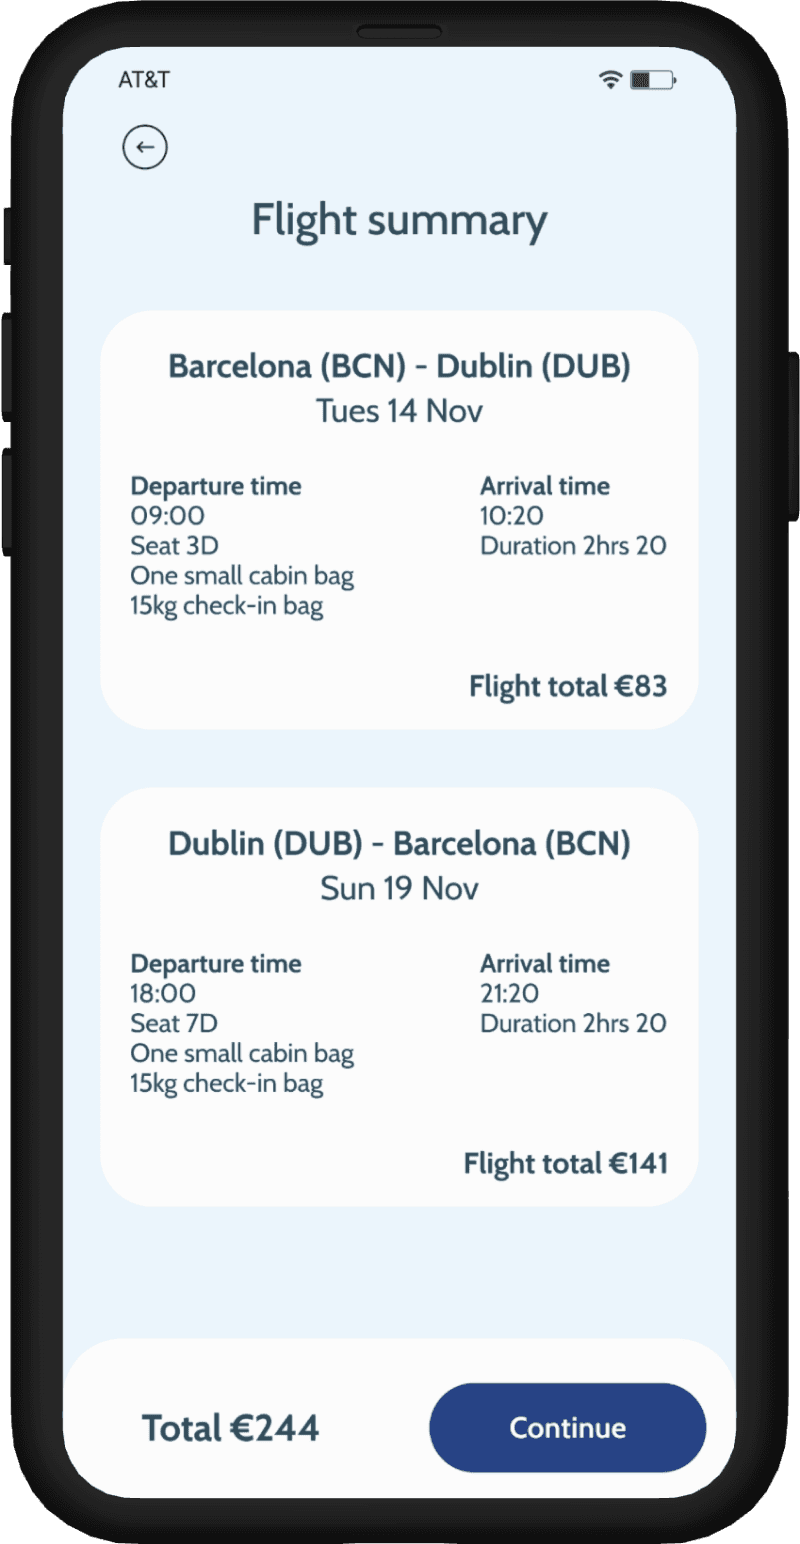
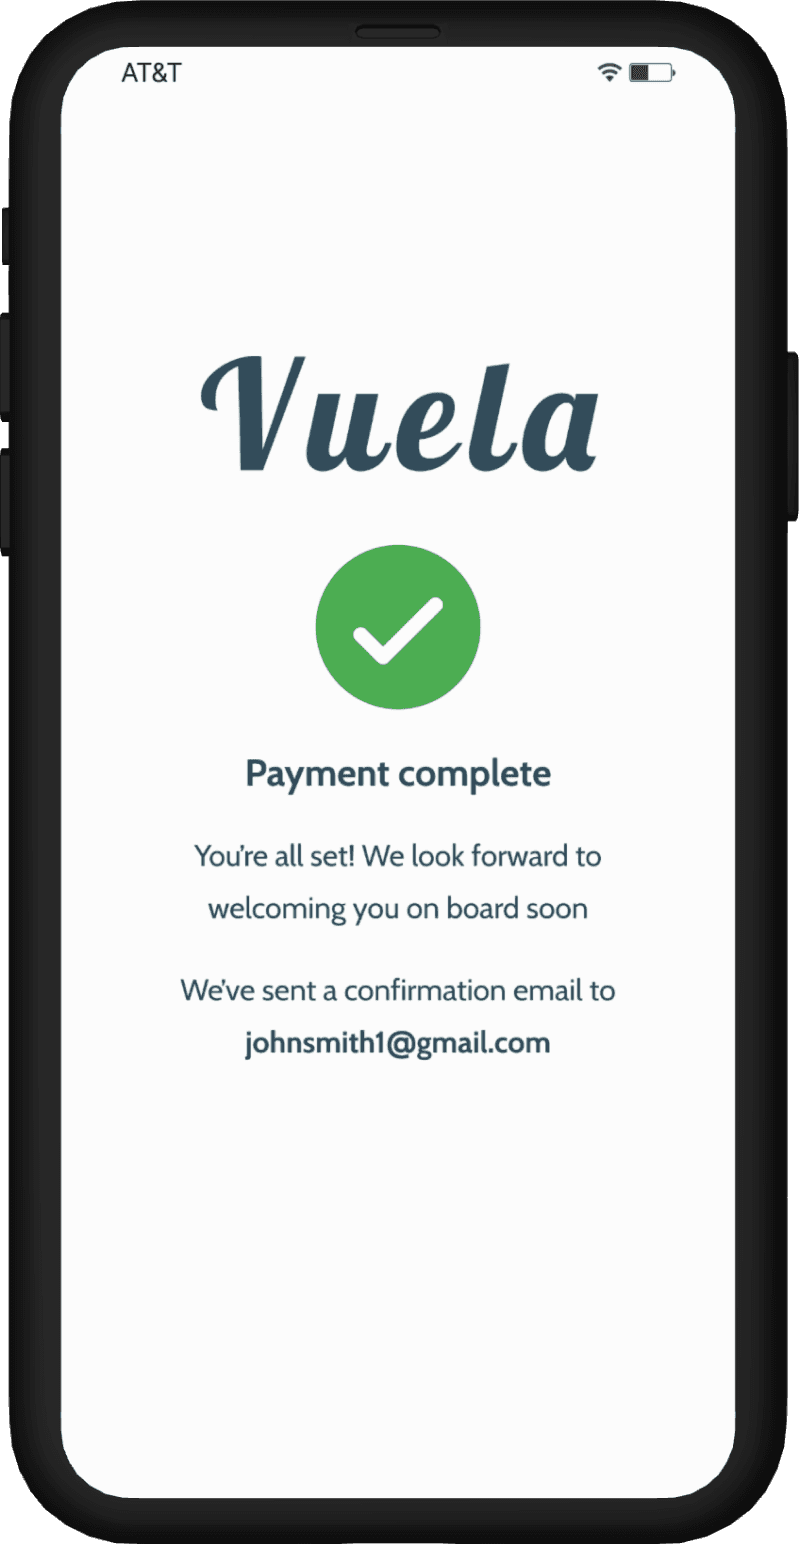
Flight Summary Screen: show all flight information in one place for easy review before purchase
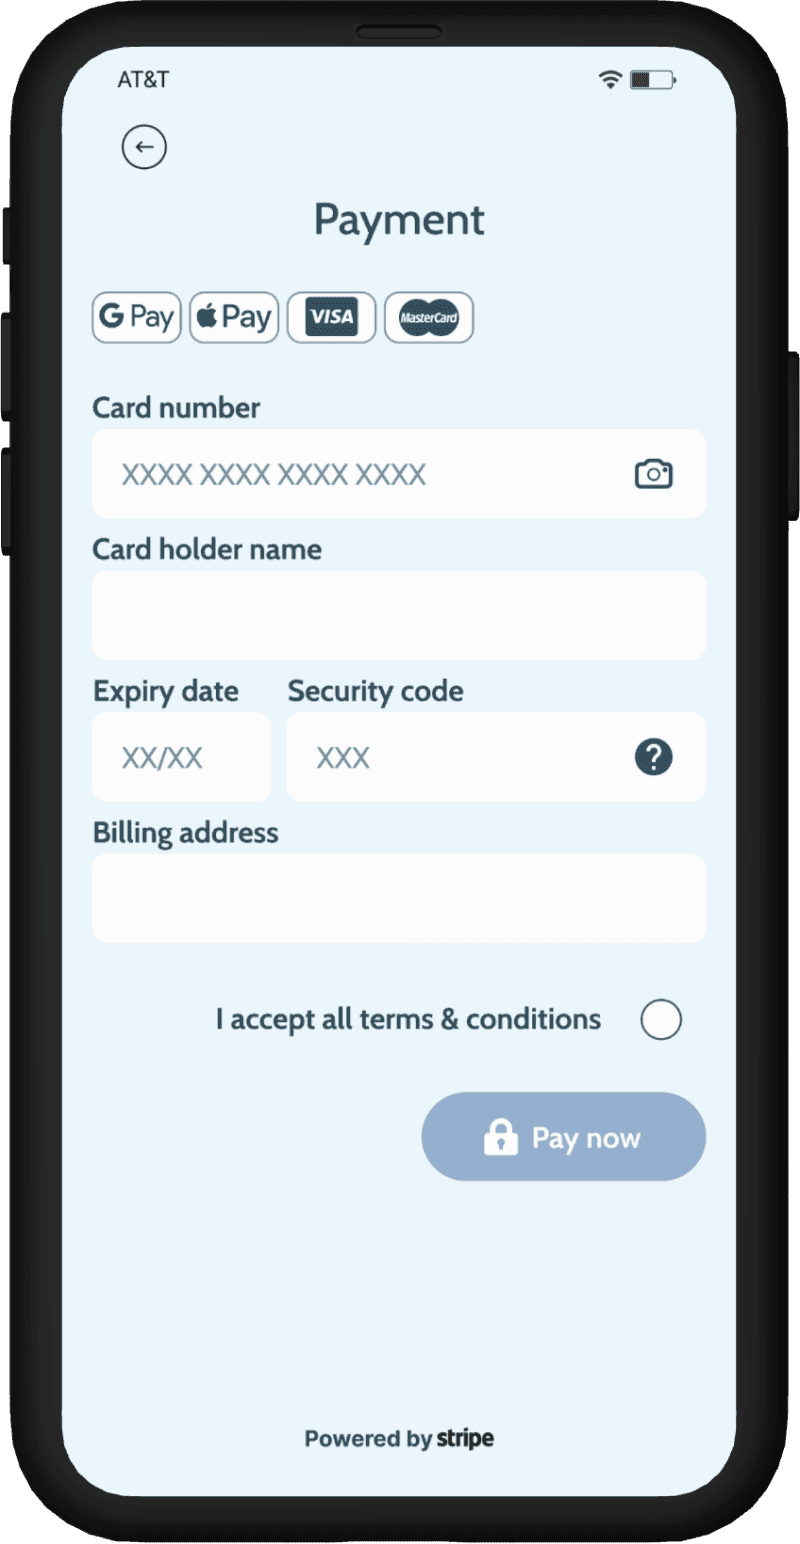
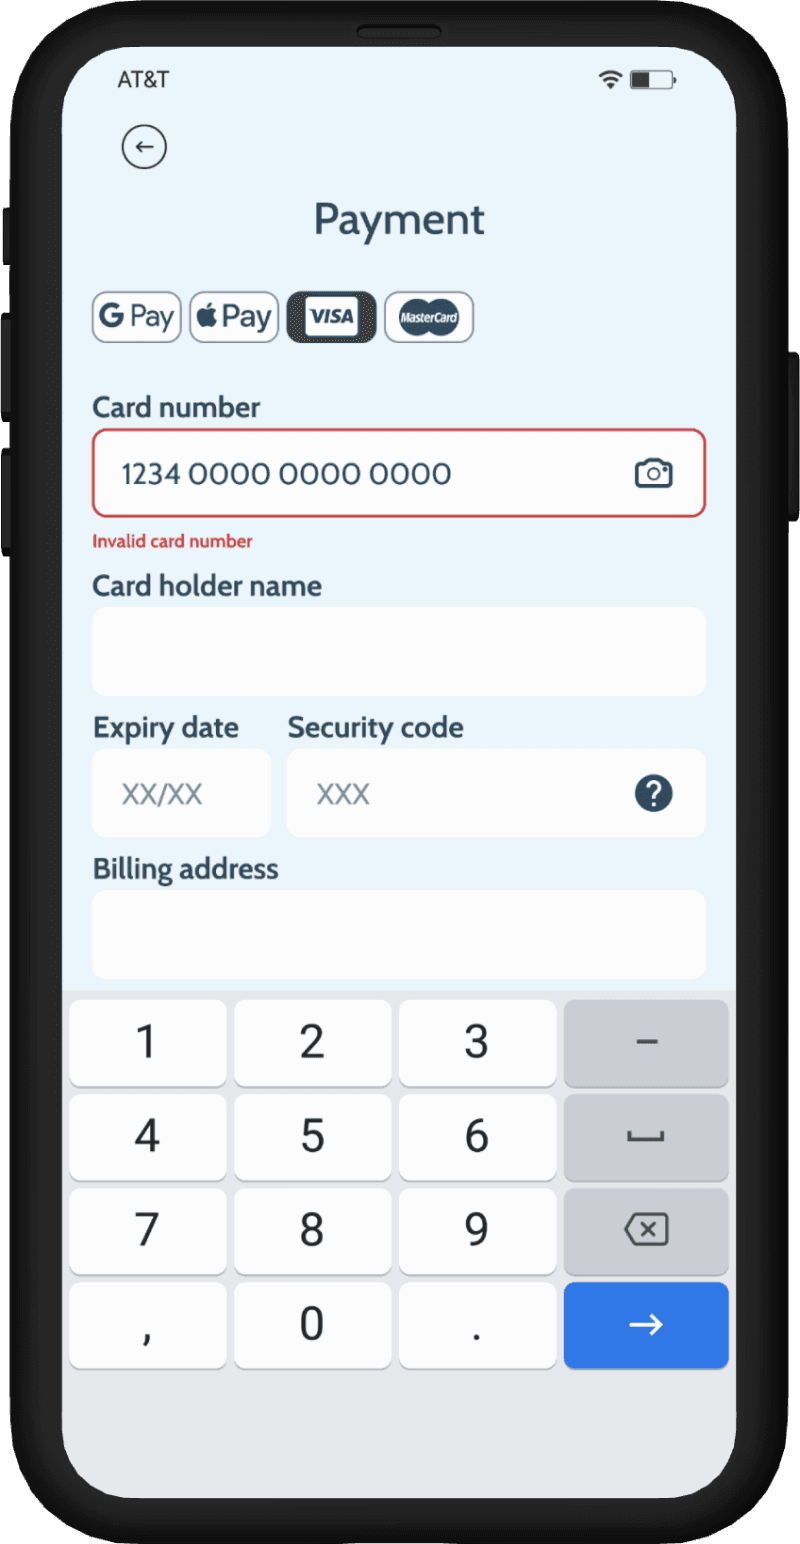
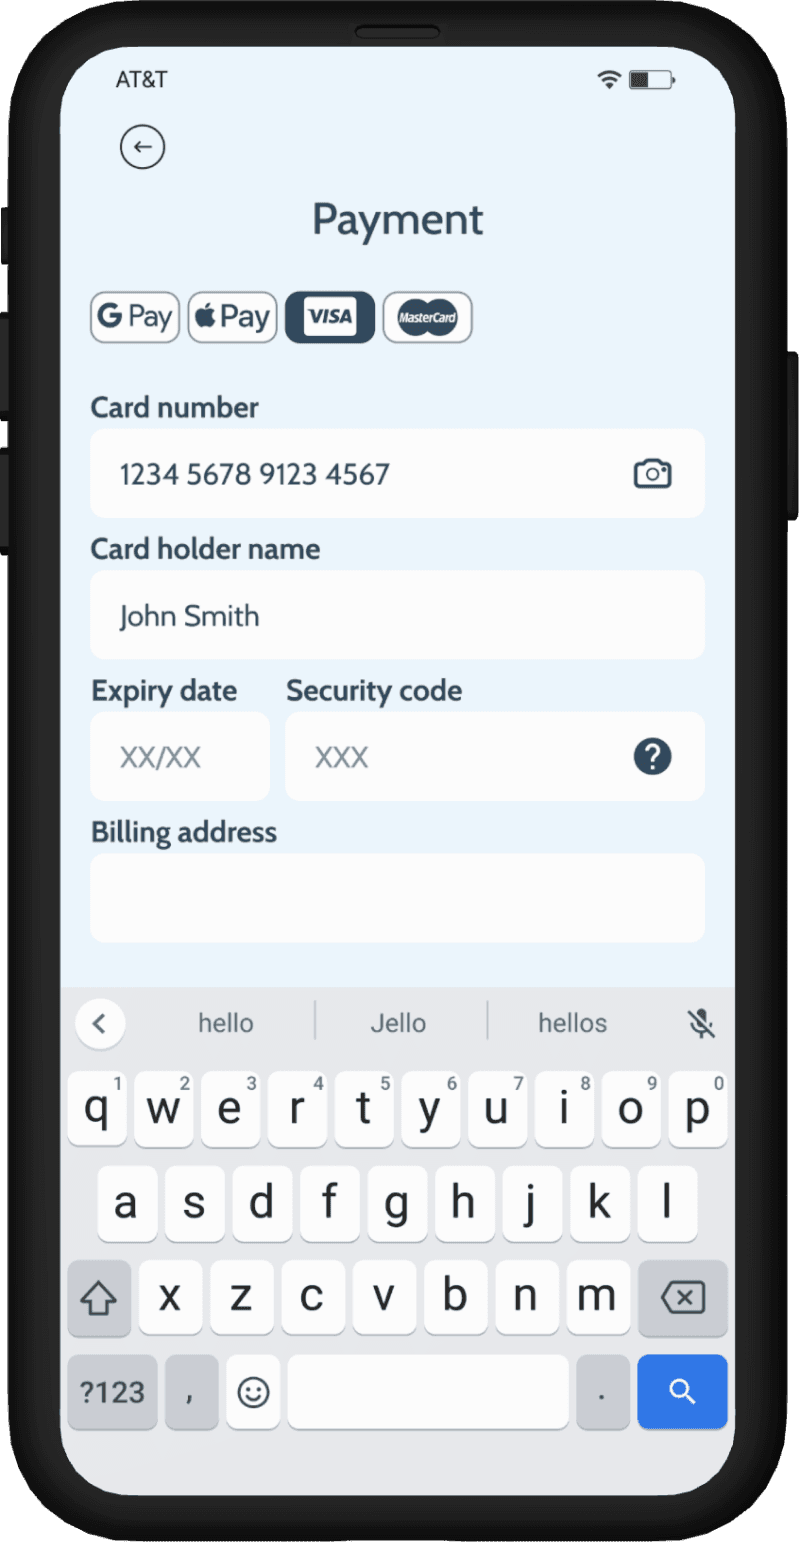
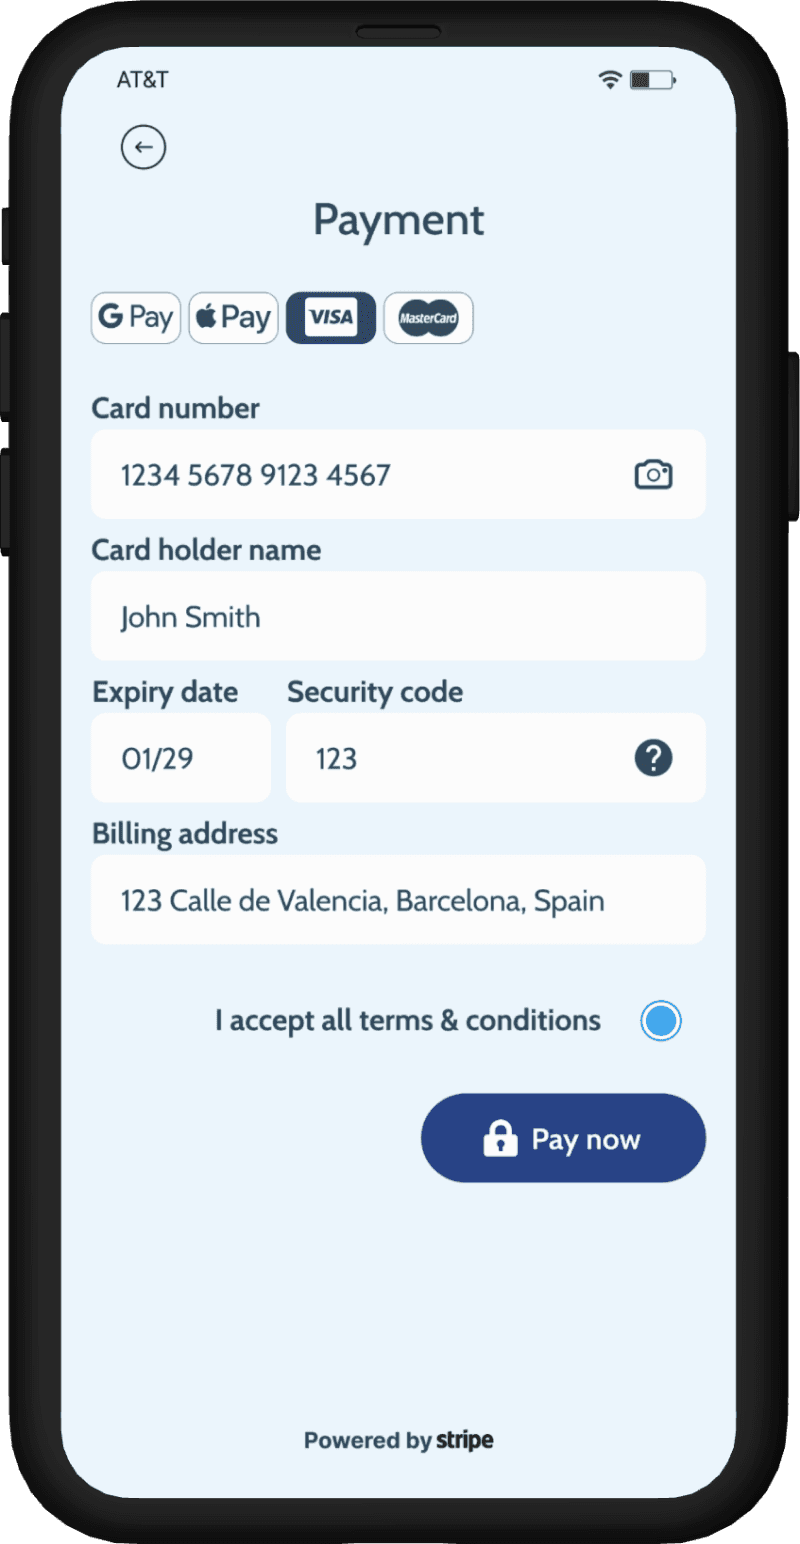
Payment Screen: align with users' mental models and established conventions to minimize user drop-off
Functionality & navigation
Back Button: Ensure it works correctly, saving all inputted data and allowing users to navigate back one page easily
Smart Defaults and Inline Validation: Populate the departure airport based on user location, use inline validation for input fields, chunk credit card input, and set appropriate input types for each field to display the correct keyboard etc.
Clear Feedback & Error Messages: Define clear feedback and error messages for users, including booking confirmation messages
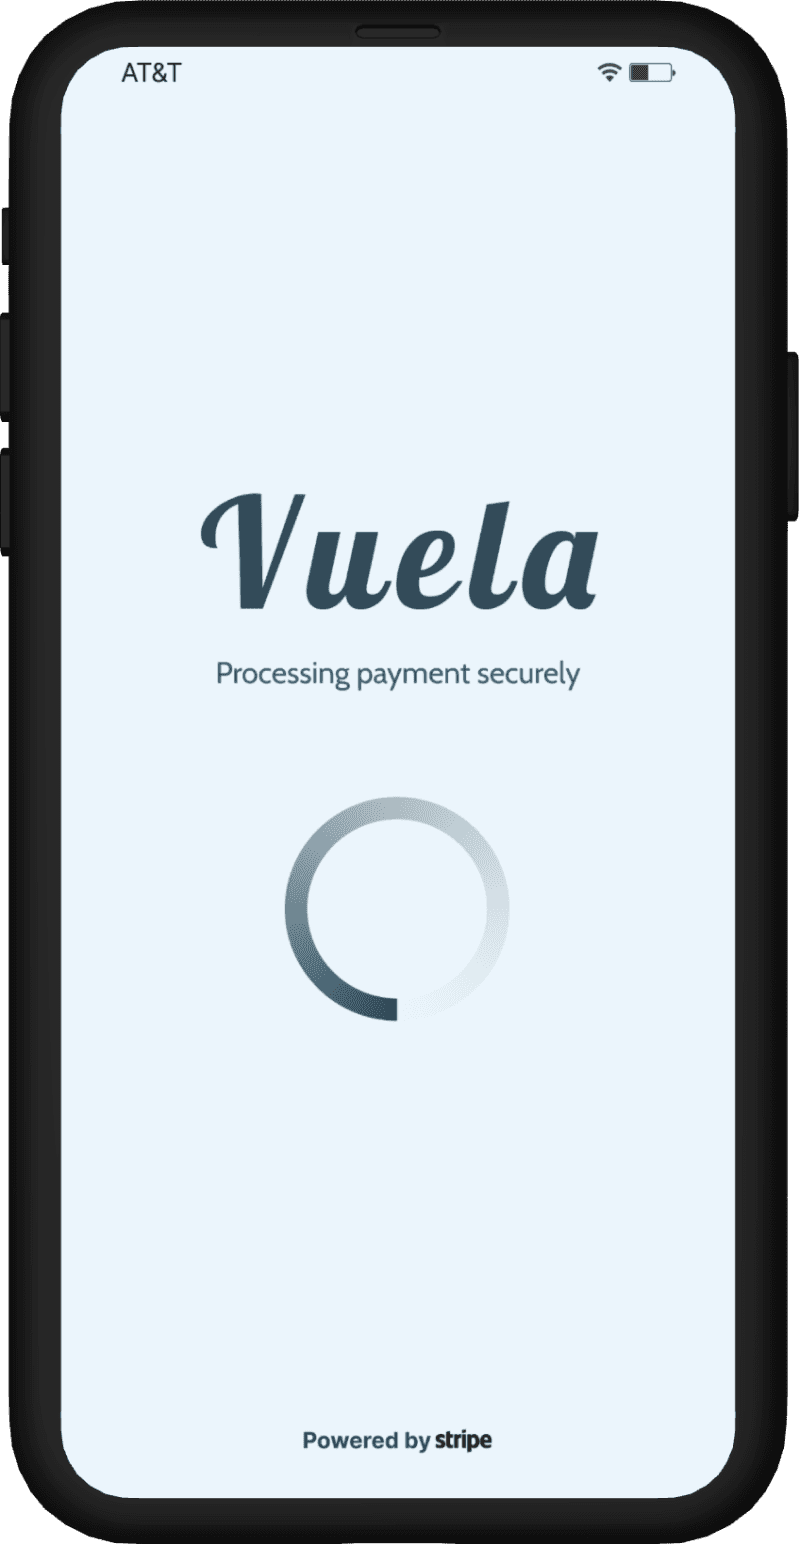
Progress Indicators: Use of progress indicators on loading screens, ensuring users are informed of ongoing processes at all times
Original wireframes & UI design
Final redesigned UI
Prototype
Prototype & annotations
Finally happy with the design, I went on to create a fully working & interactive, medium fidelity prototype in Figma which would allow for further usability testing and validation of my solution. Once all interactions screens were fully linked together, I went on to annotate each screen & specific elements ready for developer handover.
Validate
Validation - usability test
To validate my final prototype, I recruited 3 new users to test the design using Figmas prototype tool.
I followed the same process and questions before as above however did not record the sessions. If this project was to continue on to development, of course I would have done more extensive testing and have recorded everything.
Users were given the same task to complete as before:
Book a return flight from Barcelona to Dublin on any date in November for 2 people for 5 nights.
All users were able to successfully complete the task without issues or friction, validating my design solution.

UI iteration
While I was satisfied with the UX of my design, I felt the UI was lacking. The professional diploma I studied focused more on UX and didn't cover enough UI, which is crucial for a UX designer role.
To address this, I spent the next few weeks studying a UI design course on Udemy, watching various YouTube tutorials, and getting advice from senior UX designer friends.
I familiarised myself with design principles such as typography and readability, colour theory, composition, hierarchy and contrast, layout grids and spacing, as well as key Figma skills like auto layout, components and variants, and asset libraries.
The redesigned UI brought the app's brand to life, making it more intuitive and visually appealing.
Conclusion & learnings
I loved digging down into every element, interaction, seeing what worked & didn't work and then seeing it all come together in the final design. I really enjoyed getting into Figma, playing around with it and creating different components & variants as well thinking of rules to dictate how the app should behave. It was a proud moment to see the final working interactive prototype and improved design solution after all my research and careful thought.
At first, using Figma was quite a learning curve and challenging at times, but with persistence, various YouTube tutorials and some on the fly learning I got there and I'm very pleased with how the screens turned out. I'm keen to learn even more and sharpen my Figma design skills even further.
Learnings for next time were to be flexible and open to changing & adapting on the fly. Some of my ideas looked good on paper but needed polishing on screen. If something better occurred to me while designing I simply added it in, tested it out or likewise removed it if something didn't work, while sticking to the brief and only if the features were relevant to the use case of course.
As software continually evolves I learned the importance of continual research and testing to ensure further iterations of a product continue to work for both end users and the business case.
Thanks for reading
Let's connect!
© Conor Walls 2025